Tuesday, 19 April 2016

AROS Vision on Amiga 4000T Part 1

It occurred to me that I have not yet tried AROS Vision 68k on my Amiga 4000T, and with the announcement of an updated version recently I thought I would give it a go!


Currently AROS Vision 68k has two versions for Real Amiga systems - a PAL barebones version, and an RTG version for 060 Amiga systems like my Amiga 4000T. The website to download them from is here.

Here is the contents of the AROS Vision PAL barebones archive:


Logically though I wanted to try the RTG version, which was 1.6GB archive and almost 2.6GB when uncompressed as it included a lot of software in it already configured for use in AROS Vision and apparently supports Mediator PCI cards too. This appealed to my Australian laziness gene :-)

To use this RTG version of course meant I needed to have a 4GB partition for it.

Given I installed Amikit Real 8.5 on a MicroSD card in the Amiga 4000T recently (Part 1, Part 2, Final), I thought it made good sense to use a new 4GB MicroSD card in my IDE to SD Card converter for the test, removing the AmiKit setup temporarily so I could try it out.


This means I needed to prep a new 4GB MicroSD card in the Amiga 4000T for use by AROS Vision. So I fired up my older AmigaSYS4 OS3.9 build on the 127GB IDE hard disk still in my Amiga 4000T so I could do this.

I ran HDToolbox, which picked up the 4GB MicroSD card ready to prepare the RDB for it:


I didn't need to modify the detected size, so I installed the disk, with the obligatory warning of course:


HDToolbox then auto partitions the MicroSD into 3 partitions as below:


I blew this away and started fresh with one 3.6GB partition using all the disk, calling it AROS0:


I then went into Add/Update to add the SmartFileSystem to the RDB for the MicroSD card:


Now I have the Smartfilesystem (SFS) partition support on the MicroSD RDB.


I could then modify the partition AROS0 from Fast File System (International) - called Standard File System in the dialog box below) to use CFS\00 which is SFS, and adjusted the block size to 512 as recommended:


Changed and ready to save:


The warnings about destroying the existing partitions comes up of course:


I then had to reboot:


After the reboot I then got the uninitialised AROS0 ready for formatting:


I quickly formatted the disk and labelled it AROS:


The formatted disk ready:


I copied the AROS Vision RTG archive zip to a USB stick and unzipped from the usb stick directly to the new AROS partition using the shell:


This took a long time. I let it run through the evening and it finished late at night:


I then moved all the drawers from the AROS_Vision drawer to the root of the AROS partition.

The AROS partition now has the files copied and moved to the right place as you can see below:


Having got this far, I was excited to try it out, so I rebooted and went to the early startup menu to select the AROS0 drive to boot from (I set it to be a lower boot priority than AmigaSYS4 so I need to select it each time this way when I reboot). As you can see the drive appears, ready to select:


However I hadn't read the instructions on the AROS forums here - apparently some customisations needed to be made first to the startup-sequence and other things to boot AROS Vision on a real Amiga. So I booted back into AmigaSYS4 to make the changes needed.

I needed to copy across the Picasso96 .card and .chip files for the graphics card I am going to use with AROS Vision - in my case Voodoo.card since I am using a Voodoo3 PCI card in my Amiga 4000T.


I then went into the startup-sequence on the AROS:s/ location to disable the Poseidon PsdLoadModule (as I have it preloaded in the Deneb USB card flash rom on booting):


Next I needed to move the Setpatch QUIET command to occur after the AROS bootstrap load command, which I also had to change to reflect the location of the AROSbootstrap and picasso96 drivers I copied across earlier:


For some reason the AROSbootstrap location in the startup-sequence is wrong, so I had to change it as shown above.

The next problem I ran into was that the files in C and elsewhere were not set executable as extracted from the archive file. I don't know why this would be, so I set about changing the settings on all the files in the partition to be executable.


After this I could boot from the AROS Vision drive, but only to a point:


It freezes at this point every time. I can't cancel or do anything with the mouse. Hmmmm.

I noted that the AROS Vision RTG archive had Picasso96 driver files for Picassoiv setup already, so I assume the author was using a PicassoIV. I took apart my Amiga4000D to get the PicassoIV card out to try this possibility:


The PicassoIV is a great card, and I am very glad to have one - it supports true colour screen modes and also scan doubles all standard Amiga screen modes through the same card, meaning only one screen is needed to see either:


The Amiga4000T has two video slot expansion ports in it, so I can add the PicassoIV in addition to the Indivision AGA and Voodoo3 PCI without changing anything! :-)


Having switched the primary output from the indivision aga to picassoiv (actually both output at the same time, I just move the vga cable between them), I then tried to test AROS booting. First though I updated the startup-sequence to use the PicassoIV.card instead of Voodoo.card.

Unfortunately, no go with the Picassoiv either - same errors as before!


Not sure why env: is complaining. It comes up before the machine freezes at the "Debug info" line. I even tried moving the ENV: declaration near the top of the startup-sequence as well without any change.

Perhaps AROS Vision doesn't like SFS on a real Amiga - does it need to be FFS? Might try that next time.

I ran out of time at this point, so I put the AmiKit Real 8.5 MicroSD back in while I have a further think about how to get this working.

Hopefully some helpful tips from some AROS guys out there who might know what the problem is...more to come.

Sunday, 17 April 2016

Indivision ECS on Amiga 1000

One of my planned projects for some time has been to add an Indivision ECS to the Amiga 1000. However this goal has continued to elude me for one reason or another, but I decided to give it another go this weekend.


Because I don't have any old 1084, 1940 or 1960 monitors anymore, all my Classic Amiga equipment needs scan doublers installed to be able to run with my TFT screens. From when I bought the Amiga 1000 in 2015, I have had to use an old Amiga 1200 external scan doubler which doesn't work very well (it does work though) with it.


Since owning this Amiga 1000 I have added a gotek, memory expansions, and this year even tried running an ACA500 on it!

Today though, is the Indivision ECS.

Looking at the back I am not sure how I can mount the VGA port on the A1000 case without drilling a hole in it - any suggestions?


Pulling the case off the A1000 reveals the signatures on the inside of the case, including the recently departed Dave Needle, Rest in Peace mate and thanks for this wonderful computer.


Turning my attention to the inside of the Amiga 1000 now, I needed to buy a special converter for the Amiga 1000 to allow it to use the Indivision ECS on the Amiga 1000.


As you can see it has a socket for the Paula chip, and a socket for the Indivision ECS to be mounted on so that it fits on the A1000. The positioning of the Paula chip to the daughterboard shows why this is necessary.

The converter came with this really helpful german language explanation - thanks, very useful.


For those unable to read or speak German like myself, this is no help at all.

Fortunately Amigakit includes a guide on how to install it on the Amiga 1000 here.


I set to work, removing the Paula chip from the Amiga 1000 board, which is the chip marked 8634. Will never understand why they didn't label it Paula...anyway, it is the third chip shown in the shot below, on the right side closest to the daughterboard.


Important is to take note the end of the chip with the half circle cut out as it shows which way it needs to be installed to line up with the same half circle cut out on the socket itself.

Here it is removed with a chip extractor.


Yeah, I bent one of the pins..but I fixed it easily. The pins on this chip are really soft.


Here is the Paula chip next to the converter:


I then turned the Paula chip around so that the half circle end lined up with the half circle on the Paula socket on the converter as per the instructions.


Here it is installed on the converter:


Next up is installing the Indivision ECS on the converter. As per the instructions I ensured that the half circle end of the indivision ECS pins lined up with the half circle end on the socket of the converter.


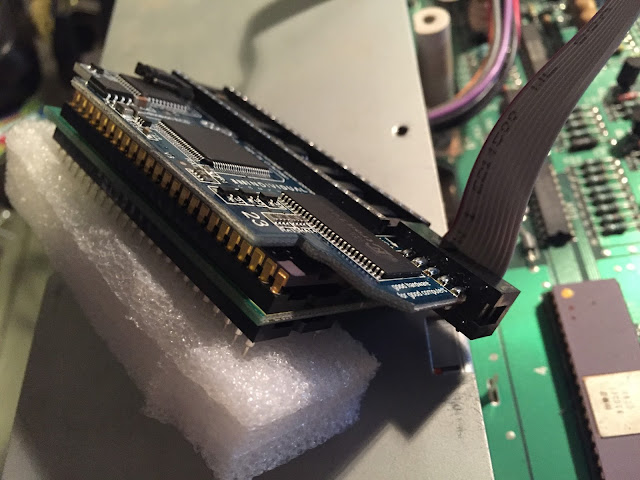
Here it is installed. I left the foam protecting the pins on the Amiga 1000 converter while doing this.


I then realised it is not possible to install this into the Paula socket on the Amiga 1000 unless you remove the daughterboard first...


So a few minutes later and the daughterboard is removed:


Now this is where I got stuck!

The indivision ecs doesn't fit!


Not by much mind you, but it doesn't fit. The pins needed for the daughterboard are covered by the edge of the indivision card:


This shot shows the problem better, you can see how the pins need to be bent out in order for the amiga 1000 converter with Indivision ECS card installed to fit:


If the daughterboard pins are bent out then the daughterboard can't plug in, so the whole thing doesn't work.

Sigh.

I was thinking to myself, why can't I just reverse the direction of the whole converter thing, and rotate all the chips so they are the opposite to normal? That would work right?

After my experiences with the X1000 though I was not willing to chance my A1000 to find this out. But please let me know - this sounds reasonable as a solution right?

I then thought I could try installing the indivision without the converter, It seemed to me that it would fit without the converter, and just put the Paula chip in the socket on the Indivision itself.


I tried that, and it fitted on the Amiga 1000 without a problem.


Unfortunately though, the indivision didn't do anything when powered on for testing. I believe it should be the denise chip in that socket anyway so it makes sense that it didn't work.


So for now I put everything back together minus the indivision and converter, and made sure it still worked, which is does. I even tested the Rys Mark II usb mouse adapter on the Amiga 1000 while I was doing that, and it works perfectly.


I will revisit this again soon if someone out there can tell me how I can get the converter card installed in the Amiga 1000 without bending pins...