Showing posts with label winuae. Show all posts

Sunday, 4 June 2017

FlowerPot AmigaOS4

Today I decided to take a look at the recently released Flower Pot (AmigaOS 4 simplified installation for Mac and Windows), from the creators of AmiKit X which I also looked at recently.


The big thing in the past few years of Amiga emulation has been the introduction of Phase 5 PPC accelerator support under WinUAE classic Amiga emulation (and FS-UAE under Mac/Linux). This has made it possible to run AmigaOS 4.1 Final Edition Classic under Windows, Mac and Linux.

However, setting this up is not so easy to do yourself. I have covered in this blog many times in the past about the installation of AmigaOS 4.1 Classic under Amiga Forever, WinUAE and FS-UAE, but it is still not the easiest thing to get up and running.

Flower Pot has been specifically created to make the process of setting up AmigaOS 4.1 Final Edition Classic under emulation much simpler, to get people up and running quicker!

The payoff for this is that finally we can run AmigaOS 4.1 Final Edition on a laptop and take it wherever we want, instead of being tied to PowerPC desktop/tower systems that are not portable.

With the new Update 1 for AmigaOS 4.1 Final Edition, the memory restrictions of the real Amiga have been lifted, opening up a much more usable amount of memory for running programs under emulation, making the emulated system much more usable.

You can purchase Flower Pot by itself for EUR9.95 for your preferred target platform - Mac, Windows or Linux.

You also can purchase it from AmiKit's website as a combo with AmiKit X as below:

You will need to purchase the Amiga kickstart roms, available with Amiga Forever 2016 from Cloanto or obtained from your real Amiga.

Note that you also need to purchase AmigaOS 4.1 Final Edition Classic from Hyperion Entertainment, and register an account on Hyperion's website with the product registration number so that you can download the Classic version ISO and the update 1 lha archive as below, needed to open up the memory restrictions under emulation.


With that done, I ran the Flower Pot MSI installer for Windows to get things underway, running on a Core i7 Alienware R3 laptop system with Windows 10 Pro installed. Although they are available, I will not be covering Mac or Linux installs for now, sorry. I will focus on Windows 10 here.

There are not any real options in the installer - it is easy to step through.


The installer finishes and directs you to read the Gardener's Guide, which explains the next steps needed to get Flower Pot up and running with AmigaOS 4.1 Final Edition Classic.


Here is the Gardener's Guide:


Step 2 is where the manual is left a little lacking to be honest. It says you need to copy kickstart rom, ISO and Cyberstorm PPC rom files to a specific location under the Flower Pot folder, but it doesn't tell you where to get them from!


In the case of the kickstart rom, rom.key and cyberstorm ppc rom files, if you have Amiga Forever 2016 installed on Windows 10, then it is located in the c:\users\public\documents\amiga files\shared\rom folder as below:


Copy the highlighted files into the Flower Pot Roms folder, located in the default installation path as below:


Here are the files copied across, along with the AmigaOS 4.1 Final Edition Classic ISO, downloaded from Hyperion Entertainment's website as covered earlier. Naming is important, so don't change the names of any of the files.


The steps are all covered well in the Gardener's Guide manual from here on:


Following along I run the Flower Pot program from the desktop:


This gives us the Flower Pot launcher as below. We can't launch yet since we still need to install AmigaOS 4, so select Install OS4 to get started with that, assuming you did the steps above first.


WinUAE then launches, and automatically starts booting up AmigaOS 4.1 Final Edition from the ISO.


It then prompts if you want to boot into the live CD Workbench, or just start the installer. I elected to start the installer as I wanted to change the language/country settings before installation:


I then choose English, Australia and the Adelaide timezone settings:


That done, it asks if we want to apply the time settings now, which of course I do, so I select System:


Things then proceed to keyboard selection:


Having selected the keyboard, things move on again:


With the workbench now displayed, there is a big "Click Me" Fertilizer icon on the desktop to run the installation of AmigaOS 4.1 Final Edition. Do not run the normal installer:


With the Fertilizer icon clicked, you are given the information about clicking Next through the installer and not selecting any options as the Fertilizer script will set everything up itself afterwards:


After hitting the Enter key, The AmigaOS 4.1 Final Edition installer proceeds as expected. Just click Next on each steps without changing any options:


The installation then proceeds as usual:


All done:


When you click on Finish, the Fertilizer scripts appears again and does it's post install configuration work, installing UAE gfx support for higher screen modes, network driver support, AHI Sound blaster 128 support and the ram extension support (which is only effective after installing Update 1):


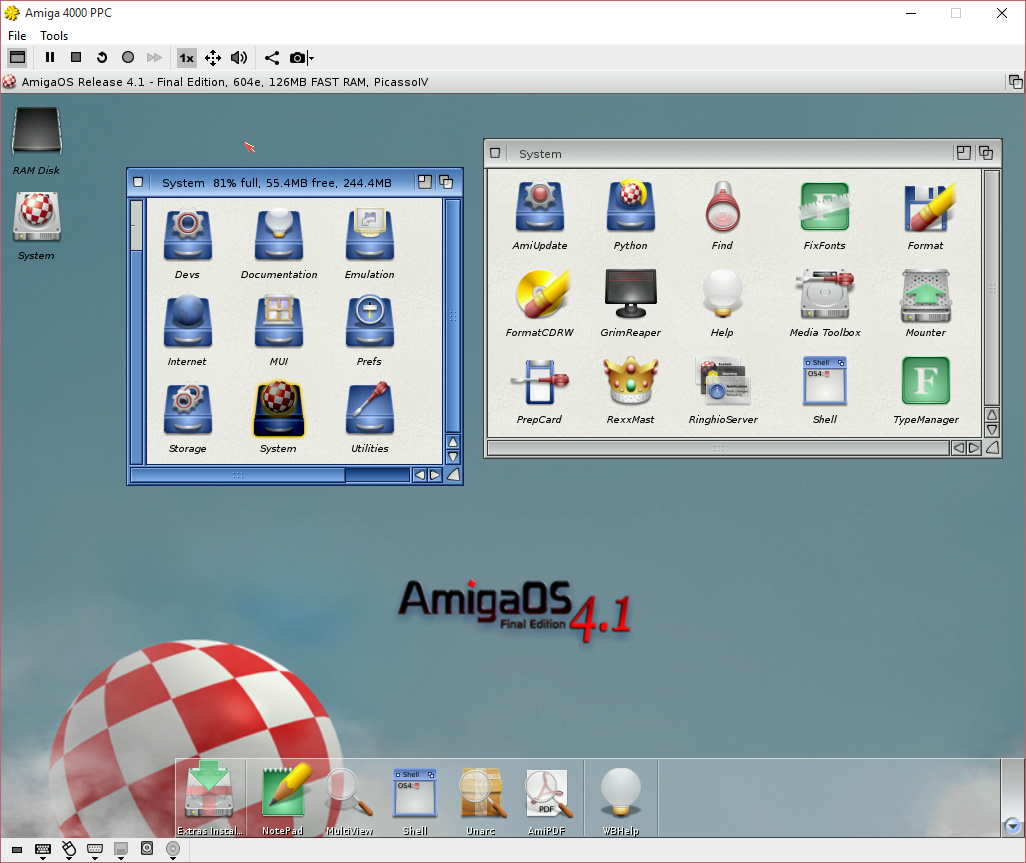
Now we have to quit the emulation as per the prompt - CTRL + F11 for Windows does the trick. I then launch Flower Pot again. This time I can click on Launch and soon after I have a full AmigaOS 4.1 Final Edition installation running under WinUAE, complete with the Windows hard disks mounted on the Workbench and UAE RTG mode 1024x768 set:


I then unpacked the AmigaOS 4.1 final Edition Update 1 archive so I can start that installation to enable the extended memory support. As you can see currently we only have 128MB of memory available to the Cyberstorm PPC rom being used for the emulation:


I then kicked off the Update 1 installation:


The installer pre-installs a python pre-requisite and then we can get to work with the main installation:


The installation is now done, and we have to reboot:


After the reboot, we now have the extra memory, with 646MB memory now available to us! Fantastic. The FlowerPot partition (Smart File System) is 2GB in size, which is ok for most things. You can utilise the windows partitions to store the larger files, music, photos, etc you use with your Windows system as well, which is quite convenient.


Next I pressed F12 to access the WinUAE Prefs and mount the AmigaOS 4.1 Final Edition ISO to the CD drive configuration so I can install the extras on the CD as they are not included in the normal AmigaOS 4.1 Final Edition installation:


I then got to work installing the optional components:


With that done I then changed the screenmode prefs from 1024x768 to a much nicer 1920x1080x32bit screen resolution, made possible with the uae graphics driver setup by Flower Pot:


After the resolution change, AmigaOS 4.1 is so much better already!


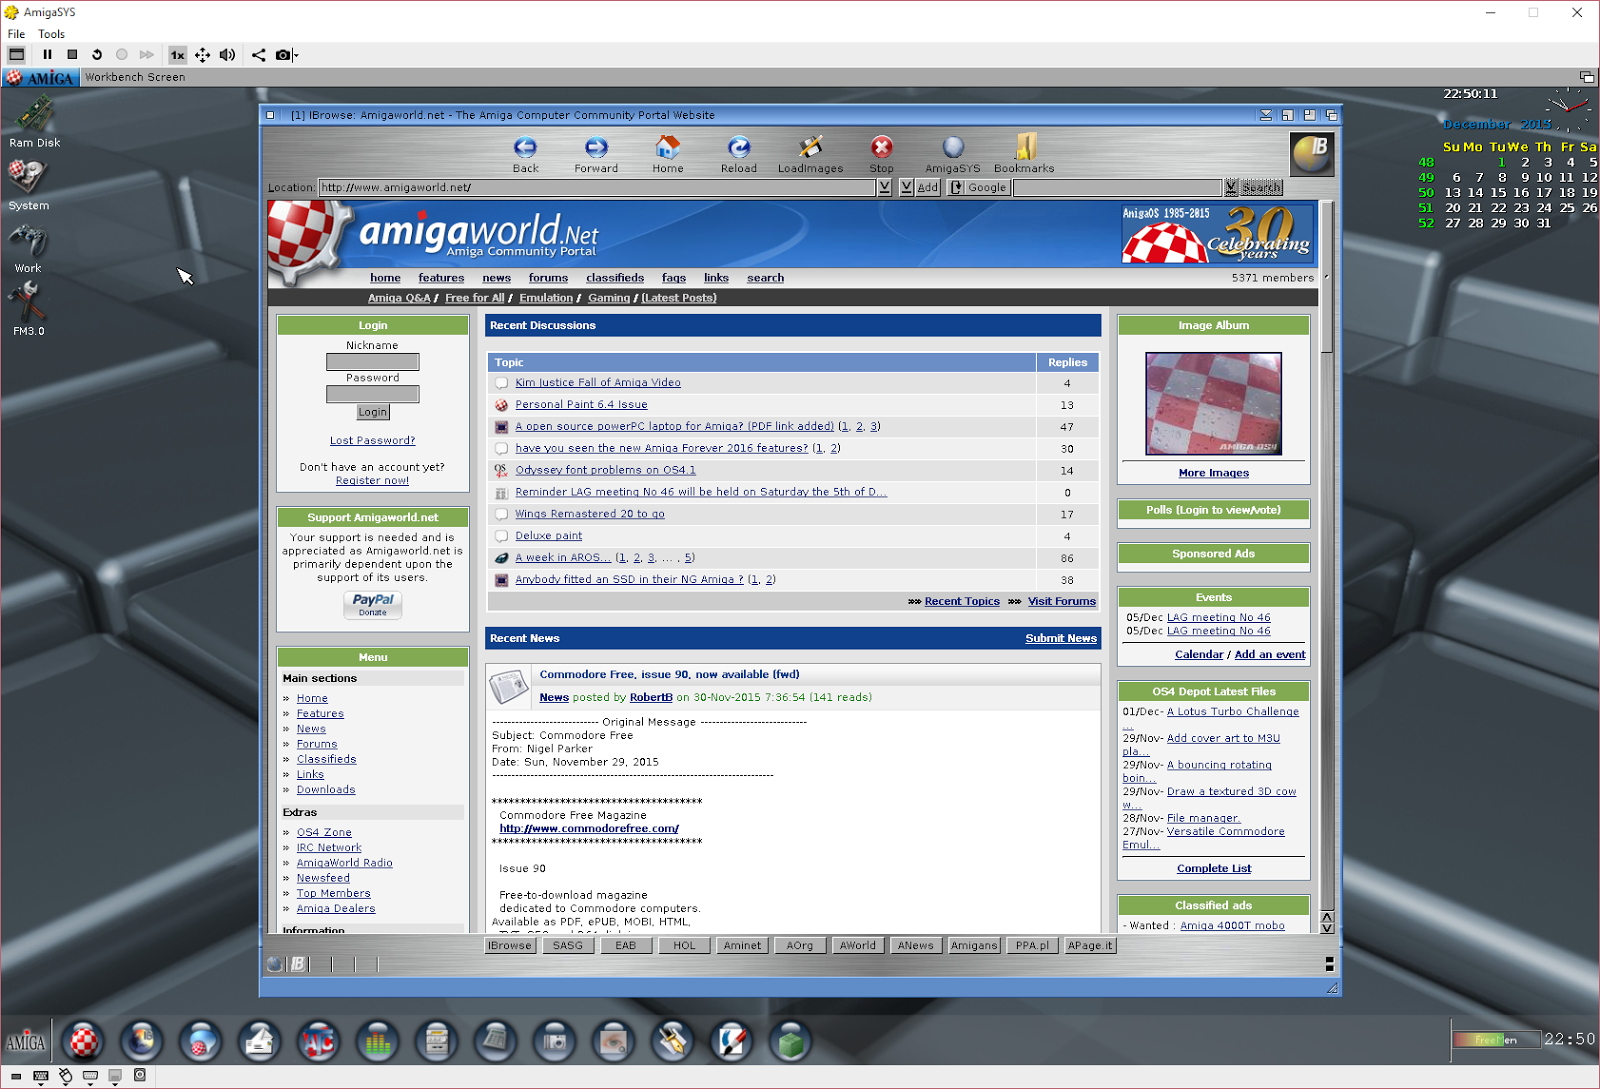
Next I ran iBrowse to download the modern Odyssey web browser to use under AmigaOS 4.1 Final Edition. Note that the Download fonts script in the Odyssey drawer doesn't work due to a certificate issue on the internet website it gets it from. So, I copied the fonts I needed from my X1000 Fonts folder to get the files I needed:


While that was happening, I also copied some installers from my AmigaOne X1000 to speed things up a bit, working on Qt 4.7 install here:


I then run the Enhancer Software installation (which you can purchase from AmiStore):


I also got AmigaAmp 3 to listen to music and things are looking better, but something is still missing I feel:


That's it, much better:


FlowerPot certainly does make getting AmigaOS 4.1 Final Edition running well under Emulation much easier to accomplish. I think they could provide a search tool to locate the files needed as part of the setup process to fill a small gap in the documentation, but I guess this is a minor quibble.

Note that AmigaOS 4.1 Final Edition Classic under emulation (or running on a real Amiga with PPC accelerator) comes with plenty of caveats, and is not a full replacement for the real AmigaOne PPC hardware, especially regarding performance, Composition/Warp3D support and newer developments like Nova that need newer graphics card capabilities.

For the time being, a real AmigaOne X1000 or X5000 system will always be best for running AmigaOS 4.1 final Edition with all of it's features and performance available.

I plan to put some games on this system soon so I can see how well they perform under emulation now that the extra memory is available to AmigaOS 4.1 and because I now have a much faster system to run it on than before.

For running AmigaOS 4.1 Final Edition Classic under emulation on your Core i5 or Core i7 based PC or Macintosh, Flower Pot certainly makes things easy to get things going.


Wednesday, 2 December 2015

Amiga Forever 2016

Today I wanted to take a look at the recently released Amiga Forever 2016 for Windows, using Windows 10 Pro x64 on my Core i7 PC (3.2GHz).


Amiga Forever 2016 is a long running Amiga emulation software package by Cloanto. It is available for purchase from their website in a couple of different versions here. It starts from USD$29.95, with an even cheaper price for users upgrading from an older version of Amiga Forever.

I have been purchasing most versions of Amiga Forever released since 2006!

Today I am looking at the Amiga Forever 2016 Plus Edition, which is the downloadable version. You can also buy the sister C64 Forever to run Commodore 64 games and demos, but I am not looking at that in this post. Strictly Amiga related today :-)

Amiga Forever 2016 uses WinUAE for the core Classic Amiga emulation, wrapped up in a simplified GUI for configuring and running any of Classic Amiga system quickly. It includes the ROMS needed for the Kickstarts (as Cloanto own them), so nothing else is needed to get up and running.

It also includes preconfigured setups for Amiga 1000, 500, 600, 1200, 2000, 3000, 4000, CDTV, CD32, 4000PPC, AmiKit, AROS, and AmigaSys. The Classic Amiga systems are ready to run in Amiga Forever 2016 with no configuration needed.


AmiKit and AmigaSYS 4 are special customised versions of AmigaOS 3.x with all the latest and greatest utilities, patches and tools installed for you and configured for best use with Amiga Forever. These builds save a lot of setup work on a base AmigaOS3.x installation.

These are not ready to run initially - they need to be downloaded and installed/configured before you can use them, and I will cover that process in this post.

AROS is also not ready to run initially. AROS is a standalone AmigaOS 3.x derived NG AmigaOS that can run on Classic Amiga hardware, as well as a version that runs directly on modern PC hardware.

New for this version of Amiga Forever 2016 is a new GUI and the support for AmigaOS 4.1 Final Edition Classic utilising the Cyberstorm PPC emulation (with legal ROM included), bridge board support, PCI support, and Picasso IV support (with legal ROM included).


Note that you do still need a legal copy of AmigaOS 4.1 Final Edition Classic, which is available from a number of stores like AmigaKit, Vesalia, AmigaStore.eu, and more. I will cover AmigaOS 4.1 Final Edition Classic installation a little later in this blog post.

The exciting thing with these emulations of Classic Amiga systems of late is the support within the emulation of bridgeboards and expansions cards like Picasso IV, A2065 (ethernet card), Cyberstorm PPC cards, and more. It opens up much better quality Classic Amiga emulation that allows us to run pretty much the same setup as a fully expanded Classic Amiga system for a fraction of the cost, and without the worry of old and failing hardware!

It is a relief to know I can continue to use my expanded Classic Amiga systems even after the hardware inevitably stops working. Hopefully that day is a long way off!

Once downloaded, Amiga Forever is a single .MSI executable file to run to start the installation of Amiga Forever 2016.


The usual license agreement that I am sure everyone reads in full every time before agreeing, right? ;-)


Fill in your registered license key and User name you would have received via email when you purchased it:


I just run the Complete option for setup, which is the default:


Associations for common Amiga emulation file formats like adf, adz, dms, hdf and hdz are setup next so they launch in Amiga Forever:


Install then proceeds and completes quickly:


Once finished the Amiga Forever player is run automatically and the GUI is indeed very different:


Initially I am looking at the Amiga Systems view available through Amiga Forever. There is also a Games section, Demoscene, Gallery and Videos (which requires the physical Premium DVD version of Amiga Forever)


If you want to, it is easy to customise these systems to your taste - below shows all the various tabs, which makes it clear it is very customisable indeed - I don't plan to cover these in much detail here as people buy Amiga Forever to get into Amiga emulation easily, but may look closer at it in a future blog entry:


Moving on now, I looked at the Games section next in Amiga Forever. In there I can select a number of pre-installed games included with Amiga Forever 2016. Just click on Play icon (or Right click > Play) to run them:


Blasteroids - an old Amiga classic game converted from the Arcade original in the late 1980's - I love the soundtrack:


The emulation window allows a number of changes to be made to the running game, as well as some helpful tips too, like the mappings of the Amiga keys to the Windows keyboard when clicking on the Keyboard icon at the bottom of the window:


I can easily change joystick and mouse mappings on the fly too:


Clicking on the Disk icon at the bottom of the screen enables me to insert a blank disk or a ADF Amiga disk to be mounted in the emulation. From here I can also eject the disk, or mark it read only, or increase the speed of reading/writing using the Turbo mode.


Keyboard mapping changes for joystick (if you don't have a USB joystick connected) are also available while the game is running:


In the top row of icons I can pause the emulation, reboot, stop it, increase the screen size (zoom 2x or 3x), go full screen, change the output volume of the emulation, take screenshots and share them on Facebook and Twitter directly!


Having finished playing games for a bit, I switched to my personal favourite area of Amiga - demos. A lot of classic Amiga demos are included, preconfigured for optimal and correct running:


So I picked Fake Elektronik Lightshow by Ephidrena, a fantastic AGA/060 demo from 2003. Brilliant effects and music.


As you would expect, it runs perfectly:


Going back in time, I then viewed one of my early favourite demos from the Amiga 500 days using Amiga Forever, namely Scoopex's Mental Hangover demo.


For fun I then ran three Amiga demos at the same time using Amiga Forever, and all ran in separate windows flawlessly:


Lastly I played the very enjoyable demo by Scoopex called My Kingdom, an AGA/060 demo from 1998.


Next I decided to go back to the Systems view in Amiga Forever, to start working on building some of the downloadable AmigaOS customised builds, starting with AmigaSYS 4.

I actually run AmigaSYS 4 on my real Amiga 4000T, so it is quite familiar to me, but it seems the Amiga Forever version has been tweaked even more! You will see below that it is listed as "Download" and not "Ready".


You can right click on AmigaSYS and select Download to get this underway - it will download it from the internet and prepare things afterwards too:


Download completed, the status of AmigaSYS now updates to "Setup", which means we need to setup the system further when we run it:


On the initial run of AmigaSYS you are greeted with some nice demo music and the installation process:


Select your language, in my case 1-EN.


It is then ready to start installing:


The setup then prompts for a screen resolution to use - I pick the largest one of course :-)


The installation then wraps up with some greets and credits:


Installation completed! Once you press Enter it will shutdown and close the window.


When you start AmigaSYS again from Amiga Forever, you then get this beautiful AmigaOS 3.9 customised Amiga system, ready to run whatever you want!


As you can see the default installation of AmigaOS 3.x is heavily modified, with all the usual patches, tools and other startup-sequence trickery done by most of us over many years of trial and error to make our AmigaOS 3.x Workbench look great. With AmigaSYS 4, it is all done for you.


Ethernet support works out of the box too, so i quickly fired up IBrowse to prove it works well!


There is also a customised Dock at the bottom of the Workbench screen with a Windows Start menu style re-implementation, containing most of the programs and utilities included with AmigaSYS 4, ready to run.


All that is left is to copy your favourite games and demos to it and enjoy! :-)

I then added my existing Amiga 2000HD folder (A copy of the DH0 from my real Amiga 2000HD) to the Amiga 2000 configuration so I could use my A2000 hard disk setup under Amiga Forever 2016. Make sure to set the 1.3 FFS boot flag since it is needed when using Kickstart 1.3 and wanting to boot from hard disk.


Here is my Amiga 2000 running nicely under Amiga Forever 2016:


Next I want to take a look at a new feature in Amiga Forever (actually it is a new feature in WinUAE) that includes a A4000PPC configuration with bridgeboard, Picasso IV and PowerPC support.

The preconfigured setup by Amiga Forever is designed to enable the easy installation of AmigaOS 4.1 Final Edition Classic under Amiga Forever. Without this pre-configuration, it is quite a technical and complex process to setup by hand in WinUAE (or FS-UAE), which is a process I have covered in this blog several times in the past.

For the most part the Amiga 4000PPC is configured, ready to have the installation of AmigaOS 4.1 Final Edition Classic. The settings for Amiga4000PPC show this - including the extra powerpc support, picasso iv, etc.


Let's take a closer look at how Amiga Forever makes it easier:


Initially the emulation tries to boot from the empty Hard disk and fails as below.


In my case I have the original AmigaOS 4.1 Final Edition CD (an ISO can also be used), so I insert it into the DVD drive which then allows me to see it in the emulation (the physical CD drive is mounted automatically).


Before running the emulation again I need to copy the BootFloppy.adf from the root of the CD to the correct ADF folder location for Amiga Forever, which in Windows 10 is C:\Users\Public\Public Documents\Amiga Files\Shared\ADF:


I could just run the BootFloppy.adf from the CD directly too I suppose...

Next, I run the emulation of Amiga4000PPC again. When it stops at the DH0 error message, I then insert the BootFloppy.ADF using the disk icon at the bottom of the window:


I then reset the Amiga by clicking the Reboot icon and the BootFloppy.adf boots up, kicking off the CD installation process for AmigaOS 4.1 Final Edition Classic:


As the hard disk is already setup we don't need to do any hard disk preparation so we can start the AmigaOS 4.1 Final Edition installer utility directly.

I stepped through the first few screens accepting defaults until I reached the hard disk preparation screen:


The hard disk needs to be formatted before we proceed, so I select the Format disks(s) option above, which then prompts me to select the hard disk DH0 in the Format window below:


After selecting DH0 and selecting Continue, I then get prompted for the Hard disk Volume name, which I call "System", and then click on Quick Format:


When this is complete I can then proceed with the installation:


On inspection the pre-configured hard disk size is small - I was surprised it was not bigger. 300MB is pretty small these days - I would have thought a 2GB partition was more appropriate. You can create larger ones if needed of course but it is not as simple as using the included one.

When prompted for the Graphics card, ensure Picasso IV is selected as below instead of AGA:


Select your screen resolution of 1024x768@60. Keep in mind the screen resolution and colour depth is limited by the capabilities of the real Picasso IV card.


The files are then copied, which takes a little while, but it's not too long.


The installation is now completed:


When you click Finish above, the machine reboots automatically, so make sure you eject the BootFloppy.adf and the CD before clicking Finish.

The system then boots off the hard disk for the first time:


Installation was successful!


I now have AmigaOS 4.1 Final Edition Classic installed on Amiga Forever 2016!


I have to admit this is the easiest installation of Final Edition under Emulation that I have ever done, thanks to the Amiga Forever pre-configured setups! :-)

You can get more information on how to do the Final Edition build, creating bigger hard disks and other helpful tips from Amiga Forever's Knowledge Base article here. I won't bother to repeat what they have already covered!

As an aside if you hold down the left shift key when launching the Amiga 4000PPC in Amiga Forever 2016, you can see the early boot setup for Picasso IV.


Pressing Escape key on initial power on of the emulation (not on reboots) will show the Cyberstorm PPC boot menu too, all emulated using the ROM files legally! :-)

I didn't spend too much on this AmigaOS 4.1 Final Edition build as I intend to use my existing already built AmigaOS 4.1 Final Edition hdf files I built on FS-UAE earlier this year to avoid repeating the build work all over again!

I did want to show how the build works though when done from scratch in Amiga Forever 2016, and how easy it is.

Note that I should have copied the base configuration of Amiga4000PPC in Amiga Forever (via Right click > Create Copy) and edited the copy rather than editing the original, but I already did it before I read the information that said not to!

Can't imagine it matters much unless you screw it up though, and I have certainly mucked around with WinUAE and FS-UAE enough to know my way around. However, for new users then you should copy it to be sure to have the original to fall back on.

Amiga Forever 2016 makes Classic Amiga emulation easy to setup and run for Windows users, and takes away a lot of the technical work in configuring environments in WinUAE yourself for optimal performance.

In a future blog post I will take a look at AmiKit and AROS under Amiga Forever 2016.