
I doubt if many of my readers are unaware of this amazing accelerator for Classic Amigas, but basically the Vampire accelerator series for Amiga 500/2000 and Amiga 600 systems is the fastest accelerator available for Classic Amigas today!
It is a very exciting development, probably the most interesting development for Classic Amiga in 2016 in my opinion!
There has been no shortage of Amiga media, forum and website coverage of the amazing functionality and speed of this accelerator, and with the FPGA core, it is being constantly enhanced with new functions and features!
Currently it emulates a 68040EC processor at 195 times the speed of a stock Amiga 500, and 5 times the speed of an Amiga 4000/040 system!
The Vampire 500V2 has 128MB of fast memory, and it also has a Saga RTG driver compatible with the UAEgfx driver under Picasso96 to support 720p native HDMI output! It also has an onboard IDE port for connecting a CF card or other 2.5" IDE hard disk, and also a MicroSD port for using a MicroSD card as a hard drive too.
I assume you probably know all this, but it is amazing what this card can do. Furthermore there are plans to implement AGA support (on non AGA systems!), FPU support and plenty more besides!
Majsta (who makes these boards for the Amiga 500) released a small amount of these (still available on Ebay as I write this) for those who are willing to pay a substantial price premium to get it now, rather than pre-ordering and waiting months and potentially years to get one. Needless to say a lot of people want one, way more than they can make - they are hopelessly overwhelmed by the demand.
In return for the large outlay, the extra funds raised by these Ebay sales goes towards the costs of making the larger production runs for the pre orders a reality. So think of what I am doing as a kind of community service to help get your cards sooner! Well, that is my justification anyway :-)
Well, err, I fell into the category willing to pay way too much for the privilege of having one now. When I bought mine it was the Vampire 500 V2 board, which just recently was upgraded to the V2+ board with additional connector for Wifi module support (not currently implemented in the core)
So let's take a closer look at my Vampire 500 V2:

In the shot above and below you can see the left side section is installed in place of the normal 68000 processor on the Amiga, with the IDE port located above that connection. The HDMI, MicroSD ports are on the right hand side, with the JTAG connector to allow upgrading the firmware via USB from a PC/Mac.


I was originally going to install this into the Amiga 500 system, but when I got it out I found out it has some kind of memory issue (green screen) which happened with or without the Vampire installed, which meant I had to change my plans somewhat.

I include some photos of that installation anyway, in case it is of interest:

The Amiga 500 has a riser on the 68000 socket already, but needs another set of risers for the Vampire to clear the kickstart rom chip next to it:

Fortunately the Vampire had two (oversized) risers included for that exact purpose:

Here is the Vampire mounted in the Amiga 500:


Here is a CF card also attached, which actually came from my Amiga 1200 build:

But, as I mentioned, I hit trouble quickly with the green screen issue on the Amiga 500. Even without the Vampire installed it was doing this. I tried removing and reseating the chips on the board but no change.

So with a degree of frustration I decided to change my plans and bring out my Amiga 2000!
I only just finished a build of my Amiga 2000 (owned since new in 1991), encompassing an 030-25Mhz, FPU, MegAChip 2MB Chip Mem, 8-Up 8MB fast memory card, 20GB IDE HD, Picasso II RTG card, Indivision ECS, A2065 network card, A2091 SCSI with SCSI CDROM, Buddha IDE and was preparing for the Bigram upgrade to 112MB fast memory in the future. I was quite happy with it!
Well, err, this all had to go so I could try out the Vampire on it. Was it worth undoing all the work and starting from scratch - oh yes!
So I pulled apart the Amiga 2000, removing all the cards.

This step is very important because of some things the Vampire does not do, namely it does not autoconfig Fast memory cards on the Zorro II bus.
So you will need to remove any Fast memory Zorro cards and hard disk controller cards that use memory onboard and/or scsi.device, as it conflicts with the onboard IDE port on the Vampire.
You also should remove any kickstart rom from the Amiga - it is not needed with the Vampire installed as it has it's own Kickstart, and the original one can cause problems if left in place.
You can keep the MegAChip installed though if you have one installed - it works fine with the Vampire on my A2000.
Having finished the removal of cards, I then removed power supply/floppy drive tray to access the 68000 processor socket.
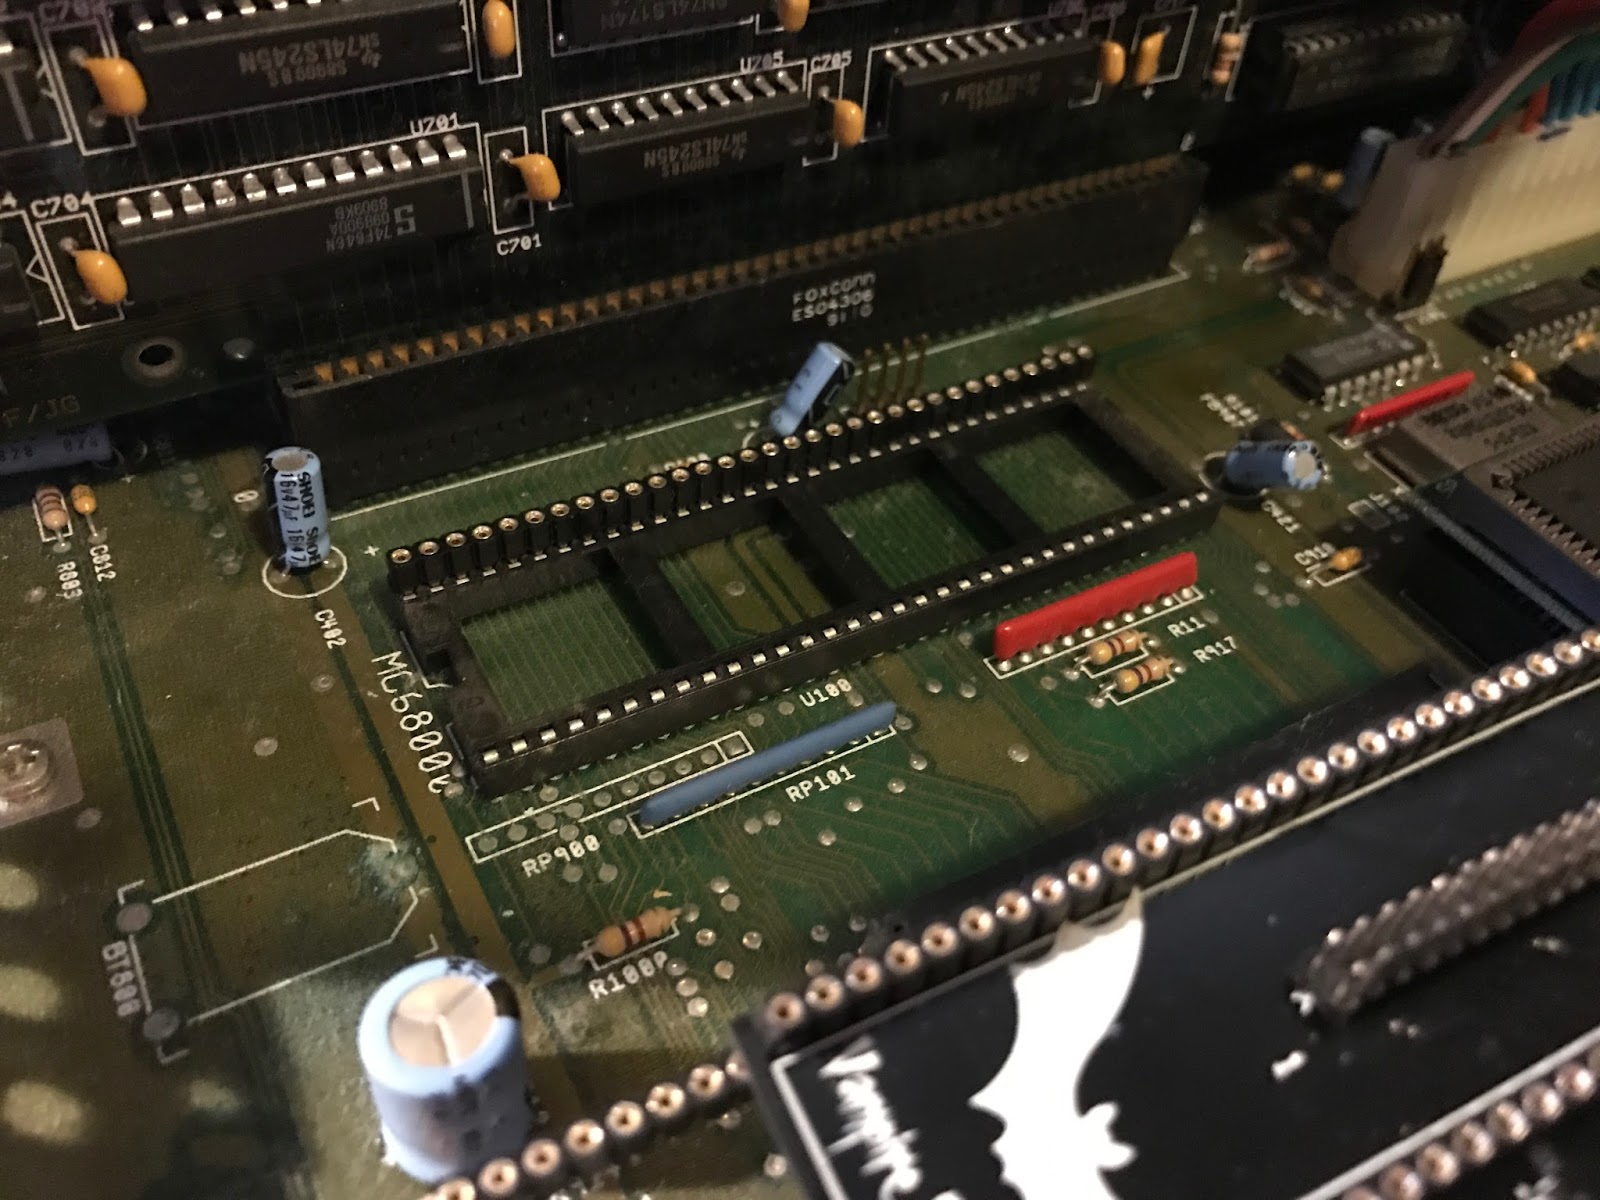
Here is the Vampire, ready for installation into the 68000 processor socket:

As you can see I have a Kickstart rom switcher installed on my Amiga 2000, which allows me to switch between Kickstart 1.3/2.0/3.1 with a switch on the back of the Amiga 2000.

As mentioned I had to remove this in order to install the Vampire. Also note that unlike the Amiga 500, the Amiga 2000 does not have any riser installed on the 68000 socket so you need the ones that came with the Vampire to ensure it fits over the kickstart rom socket (which when empty only needs one riser to clear).
Here is the Vampire looking through from the other side of the Amiga 2000 with the power supply/disk drive tray in place to make sure it cleared the Vampire with a CF card attached. It does - just.

Here is the Vampire installation with the CF Card attached to the Vampire onboard IDE port, and HDMI cable running from the HDMI port through the now empty CPU slot on the Amiga 2000 to connect to a HDMI screen.

As a reminder I did remove the kickstart rom switcher before using the system - unfortunately I took the photo before I did that, sorry!
At this point I want to send a huge thank you to the kinds folks on the Apollo-Team IRC channel who helped me through this installation and provided many helpful tips and tricks to get me up and running! There was no documentation included with the Vampire, so that is one of the reasons for this blog post too - to help other people who want to get their Vampire 500 V2 up and running quickly.
Thanks guys, you saved me a lot of guesswork.
On first power on I get the updated Kickstart 3.10 ROM v45.020 insert disk screen - this output is via the Indivision ECS:

I decided to use one display with both a HDMI and VGA input, allowing me to switch between the two cards without having to have two screens.
As mentioned, the CF card I had installed was from my Amiga 1200, which has an AmiKit Real 8 installation on it. I decided to start the build from scratch again, so I began by copying the AmigaOS 3.9 files and Boing Ball updates onto the CF Card spare Data2 partition by connecting it to my AmigaOne X1000 via USB Card reader first.
I then connected the CF back into the Amiga 2000 and booted off a Workbench 3.1 install floppy disk, wiping the System partition and reinstalling Workbench 3.1 on it - and yes I am aware I can install it directly from the X1000 too onto the CF but I decided to do it the old fashion way:

You can already see the 128MB memory in the Vampire has been recognised as the installation continues (excuse the bad iPhone photo quality):

With the installation done and reboot complete, I get my vanilla Workbench 3.1 hard disk build, and you can see the "Powered by 68080 AMMX Apollo Team - Bringing 68k back!" title bar on initial boot:

With that done, I reviewed the notes for the Vampire 500 V2 Gold Core firmware upgrade, which I had downloaded from the Apollo Accelerators website.
The readme mentions that it is necessary to add a NOROMUPDATE QUIET to the setpatch line in the startup-sequence if running AmigaOS 3.9. I will remember to do that when I get to that point.

You'll note that once AmigaOS 3.9 Boing Bag 2 is installed it is necessary to patch the "AmigaOS ROM Update" to get it working with the Vampire. The necessary patch file is included in the archive, but spatch (needed to patch the file) needs to be downloaded from Aminet. More on that later.
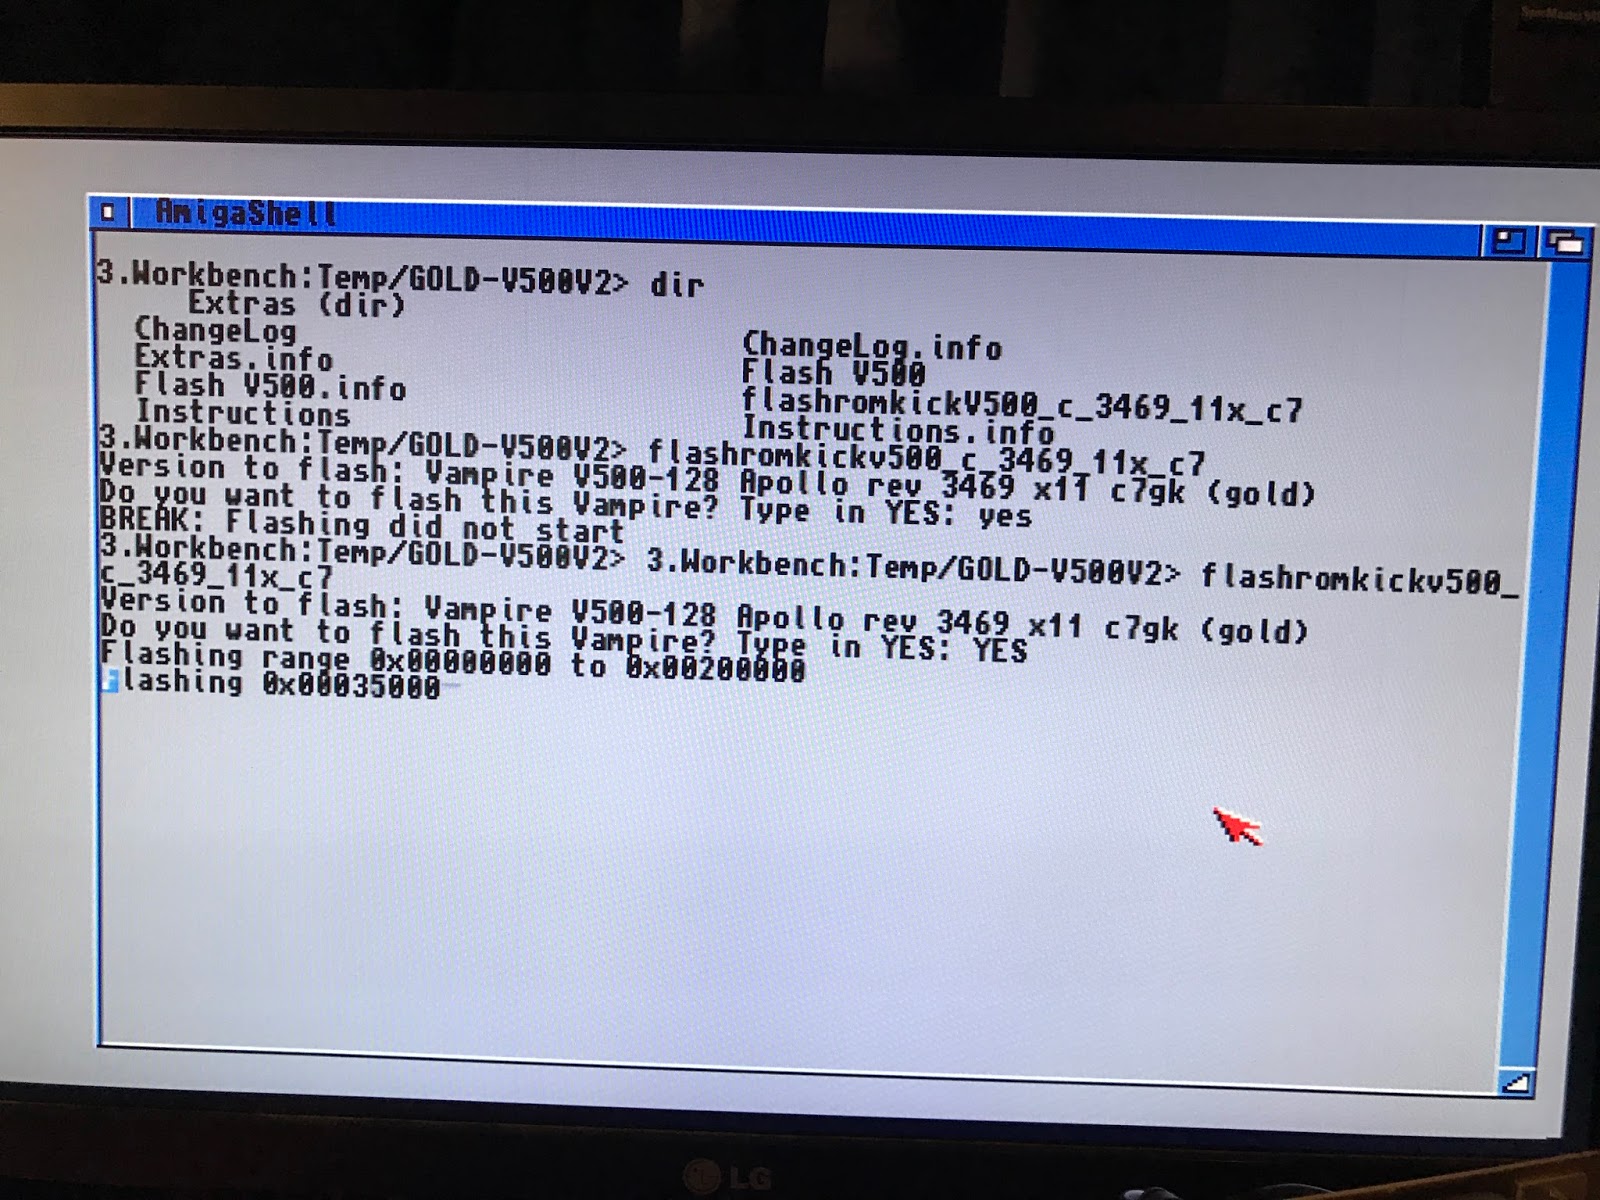
For now though, I wanted to patch the Vampire 500 V2 with the latest core, which as mentioned can be done from a PC with the JTAG connector to USB, or with the Amiga itself. I chose to use the Amiga, which as it turns out is very easy to do from the shell, as below:

It then asks if you are sure you want to flash the Vampire - note that you need to type uppercase YES to this prompt or it won't do it!

It then goes off and flashes the Vampire - do not reboot or interrupt this process:
All done!

With the flash complete I can verify the version of the firmware installed using the VampireTool included in the SAGA RTG driver archive (also available from the Apollo Accelerators website):

With a reboot we can see the Apollo 68080 Gold Edition Boot screen on the HDMI output, along with an Amiga 1000 boot sound! Nice touch :-)

With that done, I then moved onto the AmigaOS 3.9 installation work. As usual since I copied the AmigaOS3.9 source files to a drawer on the hard disk, I need to assign AmigaOS3.9: to that drawer to fool the installer that the CD is inserted via the Shell.
This trick is also needed before installing Boing Bag 1 and 2, which check for the CD also as part of the installation:

So now I get the install underway - I have covered this install process many times on this blog so I will gloss over most of it:


The observant will notice in the screen shots of the install above and below I upped the screen resolution to High Res laced with 16 colours. Install is all done:

Here is the vanilla AmigaOS 3.9 system, ready for more setup work:

I move onto Boing Bags 1 and 2, each requiring a reboot after completion.

With that done, things are starting to take shape. Remember that after Boing Bag 2 is installed (but before you reboot) you need to modify the S:Startup-Sequence to add in the NOROMUPDATE QUIET to the setpatch line, and patch the "AmigaOS ROM Update" file (located in DEVS:) using spatch and the .pch file from the Apollo Vampire 500 V2 Gold Core archive.
The format of the spatch command is (minus the < >) :
spatch -o<output filename> -p<.pch patch file> <source file>
Then backup the old file and copy the new one over the top.
With that done, a reboot is done and things come back up so all good:

The next step is to install the SAGA RTG drivers along with Picasso96, which will enable the HDMI output from the Workbench - start with Picasso 96 first, downloaded from Aminet and copied to the CF card using the AmigaOne X1000:

I won't cover the Picasso96 install in much detail except that you need to select the uaegfx driver from the list to install. The rest is really follow the prompts:

At the end of this you will need to reboot to have the uaegfx driver available for configuration in Picasso96mode prefs later on.
With the reboot done I then installed the SAGA RTG drivers from the installation archive, which has an easy to follow installer:

With this completed, and another reboot, you can then start to use the 4:3 resolution screen modes via HDMI - in my case I found that the 640x480, 800x600 and 1024x768 modes work out of the box simply by selecting them in the Screenmode prefs. I chose 1024x768 initially.
However, of course we really want to use the 16:9 screenmodes (especially 720p) with our wide screen HDMI screens! To do this we need to do some setting tweaking in Picasso96mode, available in the Prefs drawer. Every screen is different so note that this tweaking needs to be done every time you change the screen you are using - what works well for one screen does not work for another in my experience - it may not display or you may get lots of lines and static on the display until this is fixed.
In any case, you should make the 320x200, 480x270 and 640x400 resolution inactive as per below:

This then forces the driver to use the 640x480 screen mode for these lower modes, which is more compatible with modern screens.
For the 720p screen mode (1280x720), I then increased the Clock (Mhz) for each colour mode (the right side of the screen) from 50 to around 63.49 and slowly muck around with the slider with small decreases until the display shows perfectly without any drop outs or lines on the screen - use the Test button to try it until you get a Clock Mhz setting that works for you.

If it doesn't display then press escape key to get back to the PicassoMode config screen to try other settings. Eventually though, you'll get the optimum setting:

With that done, I then changed the name of the screenmode on the left hand side so that the 50Hz at the end is shown as 59Hz (the new vert. frequency setting on the right hand side of the Picasso 96Mode display). This is so it displays correctly in the screenmode prefs, and acts as a reminder for what the setting is for later reference.
Probably you will end up with a few different settings in here for different screens so keeping a useful naming convention makes it easier later to remember which is which!
With that Saved in Picasso96Mode prefs, a reboot is needed, and after that we can go into the Workbench screenmode prefs to select the 720p screenmode we just configured in Picasso96mode:


As mentioned, you need to tweak these settings if you change screens, which I did almost immediately as I wanted to try out my brand new 32" LG IPS LED monitor I bought to use on the AmigaOne X1000.
Here are the settings tweaks I did to get it working for that screen - just a small decrease in Clock to 55Hz frequency vertical, instead of 59Hz for the 24" screen:

I changed the name as before, and then selected in Screenmode prefs:

Now this is an amazing thing - 720p output from an Amiga 2000 on a 32" LED screen!

With a screen this large the normally huge Amiga 2000 case seems almost small somehow..

With the RTG display now sorted out, I moved on to the next task, getting the internet working. For this I put the A2065 Ethernet Card back into the Amiga 2000, and downloaded the A2065 ethernet driver from Aminet on the X1000 to copy to the CF Card to install on the A2000:

I then configured Genesis internet using the GenesisRA Wizard to use the A2065 driver and specified the IP address manually (DHCP doesn't work for the A2065 for some reason):

And Voila! We have internet - and thanks to the 720p true colour display, a lot of real estate for the web browser too:

I downloade a Disc Font Collection from Aminet to fix the horrible Topaz font which is used by default in Workbench - I hate that font with a passion and couldn't wait to get rid of it:

I then got onto installing the latest AHI, Delitracker, AmigaAmp and other programs as well (including their dependencies and libraries), all downloaded from Aminet:

I decided to do this entire build myself, rather than cheating by installing AmiKit Real, AmigaSys 4 or ClassicWB as I have been doing of late.
The Amiga 2000 is a special machine for me, having owned it since new, and it is great to be tinkering with it yet again!
Now I am sure you are interested to know the speed of the Vampire - well, I downloaded SysInfo (latest version) and then spatched it with the no_fpupatch (as the Vampire doesn't have an FPU and this patch is needed to allow SysInfo 4.0 to work). I could then find out.

Earlier on, before I started the build I grabbed the SysInfo performance measurements for my Amiga 2000/030-25Mhz system as below:

Not too shabby by Classic Amiga standards - quite close to an Amiga 3000/030 in fact. 7.82 times faster than a standard Amiga 600.
Now here is the same SysInfo performance for the Vampire 500 V2 with Gold Core on the Amiga 2000:

WOW! What a difference! 195.46 times faster than an Amiga 600, and 5.66 times faster than an Amiga 4000/040! The Vampire 500 has now made my Amiga 2000 the fastest Classic Amiga that I own!
You can see SysInfo detects the processor as 68EC040 processor, and the author of the software wants me to "Phone Me Now!!!". :-)
Here are the other SysInfo specs with the Vampire onboard the Amiga 2000/68080 system - 128MB Fast memory (via the Vampire) and 2MB Chip memory (with the MegAChip):


You can also see the A2065 ethernet card is installed:

Putting the new found speed to the test, I chose some 040/060 demos that support RTG that I would normally only be able to run on the Amiga 1200/4000 systems to try out on the Amiga 2000.
Needless to say, they ran perfectly, indeed, really fast!
Logic Probe - Dreamscape Disorder


I also tried out a few Venus Arts demos too - which support RTG. Apollo Accelerators website Wiki is maintaining a list of RTG games and demos that work well on the Vampire for reference here.
I also ran Foundation: The undiscovered land on the Amiga 2000, which ran perfectly and looked fantastic:

With the Screenshot software installed I could finally stop taking grainy iPhone photos of the 720p Workbench:

I quickly got to work adding my personal touches - I setup FTP access to my Mac so I could download important software more quickly to the A2000 - MP3 music, modules, demos, anime backdrops:

Someone made comment on an Amiga forum that my blog posts had some nice information inserted in between my favourite Anime girl backdrops...well, what can I say to that! :-)

I have a lot more still to do of course on the Amiga 2000 Vampire build, including installing the Prisma music card, getting the MicroSD card working using the drivers installed as part of the SAGA RTG installation, and a lot more too.
But all that can wait for the next blog post. Until next time!
Muy buena review de la aceleradora. Enhorabuena!.-
ReplyDeleteAre you going to try it in your 1000? I am tickled when I run it with the ACA 500 and BPPC but I'm looking forward to getting back to having an internal accelerator. With the Megachip and Indivision it'll be nearly the perfect Classic Amiga. Once the WiFi drivers are available, it will be perfect. Super fast and no Amiga is as cute as an A1000 :)
ReplyDeleteHi, are you saying you have more than 512kb chip ram on A1000?
DeleteI'm a bit split on the Vampire. On the one hand, it's definitely an amazing upgrade for classic Amigas, offering much better value than rare 68060 accelerators etc. On the other, it's essentially a hardware Amiga emulator that takes over the entire system, CPU, memory, graphics (included emulated AGA eventually). If you're going to use emulation, why not just put a Raspberry Pi or another small computer in the Amiga case and run UAE?
ReplyDeleteAlso, I think the Vampire could form the basis of a modern FPGA Amiga that would be much faster and accurate than a Minimig or Mist FPGA. Having to plug it into a legacy Amiga mobo when it interfaces so little with the original Amiga hardware seems unnecessary.
There's no emulation here, the FPGA behave like a real components. It's like a reconfigurable ASIC, there's no programs running on it emulating anything, once loaded with the core you need, it IS that component (or those comonents in this case)
DeleteIf you ask people who know a little something about FPGA they will tell you this is *not* condidered as "emulation".
DeleteThere is no underlying CPU that runs emulation software to mimic a 68k CPU. This is actual hardware configured to run as a new 68k CPU. If you had the money you could turn it into an ASIC and then it would be as genuine CPU as any other 68k CPU.
Emulation does not always equal software emulation, but that is what first comes to mind when people mention it due to the everyday use of WinUAE and so on. But emulation is mimicry; If a device behaves like another device but isn't the same device, it's emulating the device. If you look at AMD x86 CPUs, they emulate Intel CPUs to an extent - they execute x86 instructions as an Intel CPU would, but they're not Intel chips. As for creating an ASIC - true, it would then be a genuine CPU, but it still wouldn't be a genuine 68k.
DeletePlease note that I'm all for the Vampire, and for FPGA-based hardware in general, having used them for much more simple controllers myself. But FPGA or not, ASIC or not, it's emulating a 68k unless it uses an actual 68k.
I agree, I much prefer to keep my Amigas old school ! - I know where you are coming from, at what point does an Amiga cease to be an Amiga ?!
DeleteSay you can get 5000 X performance of an Amiga 500, what are you actually going to do with all that (relative) power ?
There is no big amount of software written to use it and old games (my fav reason to owning several Amigas) "hit the metal" so the custom chips are surely a bottleneck even for 3D games that use blitter operations ?
I am not knocking it btw, I think it is an amazing bit of kit, but each to their own I guess.
Great review. Would be interesting with an in-depth review of the Vampire card installed on your A1000. Just pre-ordered a card but it will probably take a while before I get some hands-on experience :-)
ReplyDeleteGreat review. Would be interesting with an in-depth review of the Vampire card installed on your A1000. Just pre-ordered a card but it will probably take a while before I get some hands-on experience :-)
ReplyDeleteToo many steps to get it working! It would be nice to have an already prepared cf card!!
ReplyDeleteToo many steps to get it working!! It would be nice to have an already prepared cf card..
ReplyDeleteDue to licences this is impossible I'm afraid, i like the idea though.
DeleteIt is some work but not much more as installing an Amiga with a GFX card added like CV64 3D
Will this actually work on an Amiga A1000?
ReplyDeleteThank you for the great review! Nice job.
ReplyDeleteGreat review Epsilon. Love it. Understand your approach. The journey is to be savoured as much as the end state. My 2000 with Megachip is waiting dormant in storage for this very same opportunity. Patience.
ReplyDeleteYou might want to ditch SysInfo and use something like SysSpeed for benchmarking (not that it would show up the Vampire to be slow or anything!). Even on classic 040/060 Amiga systems, SysInfo is wildly inaccurate at times!
ReplyDeleteUsed this guide to set up my V500, best info I have found so far, thanks you!
ReplyDeleteHad been reading over on the Apollo Core fourum about IDE fast mode, do you know how to configure this?
Thanks a lot for that great guide. Helped me a lot and my Vampire is running finde with os 3.9 in my A600. I love your wallpapers. Where can I get them? :D
ReplyDeleteI am glad it helped you out! You can find the wallpapers by using Google image search and search for "anime girl hd wallpaper". You'll probably find most of the ones I use... :-)
DeleteI´d like see you s:startup-sequence please.
ReplyDeleteHow did you order your Vampire? I emailed kipper but get no reply
ReplyDeleteHi! This is a great guide, thanks so much for this! Quick question tho: How do you remove the 68000 chip from the motherboard? Do you require a special tool? Can you remove it with conventional tools like pliers or a screwdriver for example? Thanks!
ReplyDeleteYou need a chip extractor. You can get them from any good hobby electronics shop. Don't use a screwdriver, it can damage the chips.
DeleteHey, Does this mean you cannot use your A2091 or Budhha with the Vampire?
ReplyDeleteHow do you get a CDROM working? Thanks! :)
You cannot use a2091, buddha, 8-Up memory cards with the vampire. Vampire can't deal with cards that share the scsi.device name. If the scsi card uses a different name (eg. oktagon.device) then it seems to work ok. CDROM can get working installing the CDROM driver under AmigaOS 3.9 (option when you install). As mentioned I copy the cd contents to the hard disk first and assign the CD-ROM volume name to that drawer. Then start the install. Under OS3.1 just install amicdfs to get CD-ROM support. the installer walks you through it.
DeleteAwesome thanks - do you think the GVP impact A2000 series 2 will work? I notice it used the gvpscsi.device so going by your logic it should be ok? Thanks!
ReplyDeleteI have a GVP Impact series II A500HD+ SCSI controller without any ram installed and it does not work -
ReplyDeleteI'd like to know how Epsilon knows about this "So you will need to remove any Fast memory Zorro cards and hard disk controller cards that use memory onboard and/or scsi.device, as it conflicts with the onboard IDE port on the Vampire."
I've opened a topic on Apollo Team's forums and no one seems to mention this at all nor is it published on their website. Should I be considering selling off my GVP controller? With only one Amiga and not being able to use it, i don't see a point to keep it. Sucks that I recently purchase a SCSI2SD adaptor for it. Perhaps I'll sell as a bundle.
http://forum.apollo-accelerators.com/viewtopic.php?f=7&t=1782&p=2338#p2338
Why do the icons have few colors in prefs?
ReplyDelete