Tuesday 31 July 2012

Installing Radeon 9250 PCI for 3D Games on X1000

One of my big annoyances with the X1000 is that I can't use 3D hardware acceleration with the included Radeon HD graphics card under AmigaOS 4.

I knew this when I bought the X1000, and I also know it should be fixed in AmigaOS4.2, when it is eventually released for the X1000.

However, in the meantime a solution has been found to enable me and all X1000 owners to enjoy 3D hardware accelerated games right now!


I have implemented this solution successfully and wanted to share some more details with you and what to expect after getting it running!

The solution lies in a firmware update and Dual Display Guide published by A-Eon for registered X1000 owners on their website. The solution also requires buying two pieces of hardware, both inexpensive. I got mine very cheaply from Ebay, both brand new - total outlay less than AUD$50.

First, you need:

1. Radeon 9250 PCI Card (256MB) with DVI/VGA/TV-Out. (We only plan to use the DVI out):


The Radeon 9250 PCI card already has Warp3D and MiniGL support under AmigaOS4 for the older SAM440 and SAM460 hardware previous to the X1000.

We can install this card in the X1000 and have dual display support and also run the 3D hardware accelerated games on the 9250 card!

A-Eon has published a dual display guide for registered X1000 owners on their website a-eon.com (You need to be registered on the website, and to do this requires your X1000 serial number). I won't detail the process of setting up the dual display since it is clearly covered in the step-by-step guide from A-Eon. It also needs a firmware update to enable dual display support which also has a step-by-step guide. I can confirm this all works, as you will see below!

So all sounds great, right? nearly.

The issue I found is that because the X1000 already has it's two PCI slots filled with the network card and sound card, there are no free slots for the Radeon 9250 PCI card to go into without losing sound or network support!

Not good.

However, a solution is at hand. The X1000 has three PCI-e slots, all unused in the First Contact systems as delivered.

So the next piece of hardware you need is:


2. A PCI-e to PCI bridge card (this one is generic brand):


 This card allows us to connect a half-height PCI card to the PCI-e slot on the X1000. The bridge card has a molex power connection, which needs to be connected to one of the many spare molex power connectors inside the X1000 to function.


First, I attempted connecting the Radeon 9250 (as it is half-height) to the PCI-e bridge card but the card was too heavy and didn't sit well. (As shown below)

 
So I decided not to do this, and instead to relocate the network PCI card in the X1000 to use the bridge card, and then connect the 9250 graphics card to the PCI slot the network card was using. This solution for the PCI-e bridge card with PCI network card connected was much better, as shown below:


Before installing the Radeon 9250 PCI card or the PCI-e bridge card in the X1000, I had to make sure I was running the latest firmware and followed the configuration steps in the A-Eon Firmware upgrade guide.

Updating the firmware gives you a newer boot logo from the original logo, but obviously plenty of other behind the scenes changes - the most important addition for me is to support the dual display configuration that I am doing here.

Note: I found that you need to use a USB stick less than 2Gb for it to update the X1000 firmware correctly. I tried 4Gb and 8Gb USB sticks and they didn't work for me.

That done, I then copied the original Warp3D.library back to the libs: folder to replace the Wazp3D software library I was using, since I now have a display card with Warp3D hardware support available!

I then updated the Radeon HD 2D graphics drivers and applied the Dual display Monitor configuration set in AmigaOS4 as per A-Eon's guide.

So after all that work I now have the PCIGraphics and Radeon 9250 monitors configured as per the Dual Display guide, ready to go:


So next I powered off, opened the X1000 case and got to work! I chose to use the second PCI-e slot from the top of the motherboard, the one closest to the Xorro Slot. Below you can see shots of the PCI-e bridge card with PCI network card installed in the X1000 and the Radeon 9250 PCI card in the bottom PCI slot:


So now, ready for power up. I am using one Display, with DVI input from the 9250 and VGA input from the Radeon HD card (using a DVI to VGA converter).

On power on, the X1000 boot logo now appears on the display of the 9250 PCI card, but appears in blue instead of red, as below (the A-Eon guide mentions this as an effect on the 9250 card, but not a big problem in my opinion):


The Workbench boots up as normal, now using the 9250 PCI card as the primary display instead of the Radeon HD card. Both cards are active in the Workbench and I can choose to use either one, as shown below in the Screenmode preferences:


I found while checking this that the 9250 does have some horizontal graphic glitches that flash up on the screen from time to time (not permanent), especially when moving windows around the screen. A-Eon mentioned this in the Dual Display guide also.

I minimised this issue on the X1000 by changing the GUI preferences in the Prefs folder to use the 3D acceleration in the effects section, which couldn't be enabled on the Radeon HD card. This is shown below:


The network card worked perfectly, having moved slots. No reconfiguration was needed and I could access the internet and other computers as normal.

So now, finally, I am ready to try out some 3D hardware accelerated games on the X1000 for the first time! Previously I couldn't run these games at all, or they run very slowly on the Wazp3D software library.

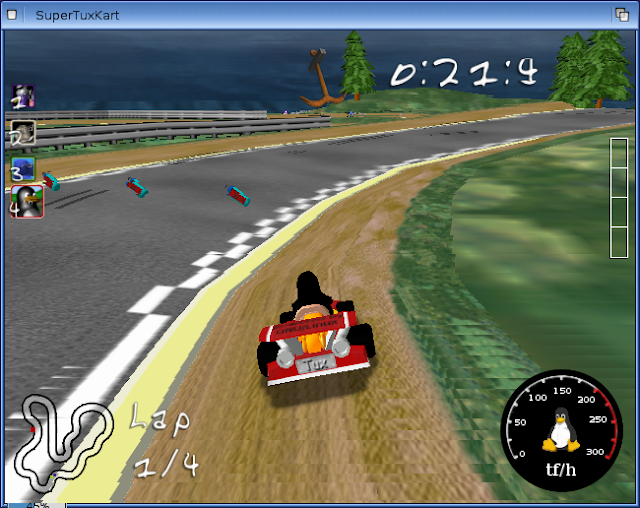
So here are some screenshots of some games I tested using the 9250 card on the X1000 and they work perfectly!

Epiar


X-Moto


SuperTuxKart


I should mention that when I tested the preview version of Flare today on the 9250 it was a lot slower than on the Radeon HD card. Fortunately with the dual display setup I can change to using the HD card to run this game.

I also tried out F1 Spirit which worked - previously I couldn't play the game as nothing came up when the main game screen at the track started...

I tested Elude's We Come In Peace demo which now runs perfectly using the 9250 - previously on the HD card it is was quite slow.

I plan to do some more games testing and report on how they run on the X1000 using the 9250 PCI card like Quake I/II/III and other 3D games too! I ran out of time for today though!


I look forward to AmigaOS 4.2 and having this same 3D hardware support on the Radeon HD card as well...In the meantime I can now play 3D hardware accelerated games on the X1000 and I am very happy about it!

Saturday 28 July 2012

Commodore 64 Emulation on X1000

Today I wanted to talk a bit about Commodore 64 (C64) emulation on the X1000.

My first home computer was a Commodore 64, and I had a great time playing many classic games during the 1980's before we upgraded to an Amiga 500.

Most Commodore 64 floppy disk based games are preserved these days from their original physical medium as d64 format and tape based games in t64 format. These files can be easily obtained via Google.

In my case I chose to use the VICE C64 emulator on the X1000, available from os4depot.net. It emulates the C64, C128 and many other Commodore computers of the period (VIC20, C16, etc).

I have to say to be honest that I am only interested in the C64 emulation - and I am pleased to report that it runs at full C64 speed on the X1000.

Below is an example screenshot of VICE running one of my favourite C64 games Nodes of Yesod, on the X1000:


Something to be aware of before running VICE is that if you want to use USB joysticks with the emulation, you need to do some config work which I will explain below.

First, run AmigaInput prefs (as shown below). You must do this everytime before you run VICE if you have not done this step since powering on the X1000.


When you runs AmigaInput preferences, you will get a window like the one below. Click on USB in the Available interfaces section, and then highlight your USB joystick in Available Drivers section as also shown below. Then click Save.


This step is needed so that the USB joystick is recognised in AmigaOS 4 and thus made available to VICE. Little bit weird to be honest, and should be working without this step I think, but the joystick doesn't work if you don't! If you know another way please let me know!


Next, when running VICE, we need to change the control method from the keyboard to use the USB joystick. To do this, right click on the top menu, then highlight Settings Menu and select the Joystick Settings option. On the Joystick settings window that appears I will config the Joystick in Port #1 on the Commodore 64 to use AI/Keyset A. You do this by clicking on the cycle menu (as shown below) until AI/Keyset A is shown:

We then need the click on the AI/Keyset A button to show the VICE window (shown above) and configure it to use the USB Joystick. In the AI Device section, select your USB joystick as named in the AmigaInput prefs window shown earlier. Then click Change next to each of Up, Down, Left, Right, Fire sections - it will then wait for the joystick input - move the joystick in the appropriate direction to configure it. Then click Change for the next one, and so on. When finished press Ok.

Before we click on Ok in the Joystick Settings window, note that now the AI/Keyset A is set for your Port #1 joystick. You can change Joystick Port #2 to use the same keyset when you need to use the joystick in port #2, instead of port #1. C64 Games tended to change which joystick port they used so from this setting window you can change the port by selecting the AI/Keyset A to whichever joystick port you need it to work on. This setting can be changed while the game is running in the emulator.

So if you now click on Ok for the Joystick Settings window, you are done and ready to load a games into VICE! (There is a lot more customisation that can be done to VICE in the Settings menu, but it is not needed to play games and I wanted to get to that part!)

I am assuming that if you read this far you probably owned a Commodore 64 at some point and are familiar with how they work to load games. If not I include a little bit of simple instruction.

I should note that some .d64 have just the one game on them, some of them have more than one game. So for disks with just one game on them, right click the top menu, highlight the File menu and select the Autostart disk/tape image... option. It will then open a window requester prompt for a d64 or t64 file, and when you select it, it will automatically load the first game title from the disk and run it automatically too, as below:


For disks with more than one game on them, right click the top menu, select File menu, highlight Attach Disk Image option and then from the submenu, select the Drive 8 option. It will then prompt a window requester to choose a d64 image Then on the C64 screen in the emulator, type in:

Load "$",8  

Press Enter. When it comes back with the READY. prompt, type LIST and Press Enter.

This will bring up the list of the disk contents. you can then load the game you want by typing in the name of the game shown using the list command. eg:

Load "game",8,1

Press Enter. When it comes back with the READY. prompt, type RUN and Press Enter. The game should now run!

I didn't focus much on tape image manipulation (nearly all my games are d64 images), but this VICE emulator support all standard tape operations (as many tape games required fast forward or rewind to particular counter positions to work) - disk images are so much easier to manage and recommended!

So next of course I tried out some of my favourite C64 games on VICE which all run perfectly during my testing - and I did a lot of testing playing!

When finished one game, you can reset the C64 for the next game from the File Menu - highlight the Reset option, select Hard from the submenu to then reset the C64. Then load the next disk/tape images as shown previously above.

I didn't try out any demos on the C64 because I have never watched any C64 demos (terrible I know)! I do follow the Amiga demo scene and PC demo scene closely, but never really got into the C64 demo scene!


I include some screenshots below of the games while they were running on the X1000:

Oasis Of Shalimar


Archon


Raid Over Moscow 


Pitfall II


Mutants


Skate Or Die 


I have many more games I tried out in the emulator and they all worked well - classics like The Last V8, BC's Quest For Tires, Hot Wheels, Wizball, Parallax, Beach Head I and II, Rock N Bolt, Bobby Bearing, Impossible Mission, Katakis, R-Type, LED Storm, Pinball Wizard, Raid on Bungeling Bay, Ghostbusters, and so many more.


One of the reasons for the delay in this blog entry was because I got carried away playing Nodes of Yesod and Mutants again - I loved these games as a kid and still they are a lot of fun to play!

 I hope this inspires you to try out your favourite Commodore 64 games on your X1000 - they run perfectly!

Sunday 22 July 2012

Continuing with Timberwolf RC1 on X1000

I have been doing a lot of things with Timberwolf RC1 on my X1000 in the last few days since my original post here, and I wanted to follow up on that article and include some of the new stuff I have added since then!


The first thing is that I fixed the Japanese font display issue I was having in the original blog post about Timberwolf RC1. I did this by copying the Microsoft Standard English, Japanese and Korean fonts from my Windows 7 installation (Copied from Fonts program located in the Windows 7 Control Panel) to the System:Fonts/_Truetype folder on the X1000. You could also use Open source Japanese fonts for this if you don't have access to a Windows 7 machine - a reader of my previous post provided a link to download the open source Japanese fonts from http://ossipedia.ipa.go.jp/ipafont/index.html

After doing this step, the Japanese and Korean web pages display correctly in Timberwolf! In addition, because I copied the English fonts too, the English language web sites look much better also using standard Windows fonts. Some examples with the new fonts are shown below (click to expand to see the detailed appearance):

OS4Depot.net:


Yahoo.co.jp (Japan):


www.kt.com (Korea):


Having fixed Japanese websites in Timberwolf, I can now also use the Japanese Add-ons for Timberwolf I talked about - Rikaichan and Moji.

Rikaichan adds a smiley face icon on the right of the Timberwolf window, like below:


When you click on it, it activates and whenever you move the mouse pointer over some Japanese text, it will translate a character or the whole word on the screen, as shown below (click to expand):


Very useful! You can click the smiley face icon to deactivate it.

Moji is also a lookup for Japanese words, which operates as a side bar add-on. You can cut and paste Japanese text into the Moji side bar or just right click on some selected Japanese test and select the Lookup Word/Kanji in Moji option. You will then see the translation - in some more detail than in Rikaichan:


Unfortunately AmigaOS 4 itself does not support Japanese or Korean, which is why the Timberwolf title window has some strange characters in it sometimes when the website title is in Japanese, even though the website itself displays correctly. Hopefully Japanese support is added to AmigaOS4 in the future.

Anyway, moving on now to other things I found in Timberwolf!

You may have noticed I have now got a background image to Timberwolf. This is called a Persona and there are many to choose from - all available within the Add-ons option, accessible from the Tools menu in Timberwolf. If you click on the Personas link on the Add-ons main page that comes up you should see something like this:


 Simply move your mouse over a persona and it will automatically change Timberwolf to give you a preview of what it looks like! Simply move the mouse away to try another one! When you find one you like, click on it. A new page will come up (like below) where you can click on the Add to Firefox option to add the Persona to your Timberwolf setup permanently:


I like the Nightly and Aurora Persona, and this is one I am now using!

Next, I installed the Aniweather Add-on. This add-on allows you to display the current temperature and the next few days temperature for your home city within your Timberwolf window in the top right corner. By default it updates every two hours. You can also mouse over the temperatures to get more information (although note that the plugins for the animations don't work in this view on Timberwolf). It looks like this once configured:


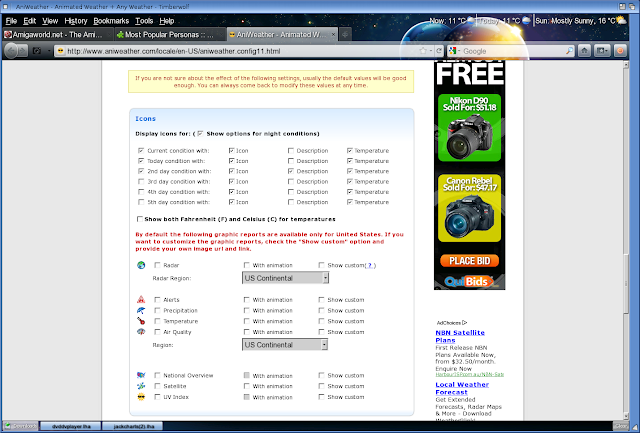
The author assumes everyone lives in the US and doesn't use Celcius so if you don't live in the US, you will need to modify the preferences. The preferences are displayed in a webpage the first time you open Timberwolf after installing the Ainweather Add-on. I show this in the next few screens below, in which I adjusted the preferences for Adelaide, Australia by default (I also added Tokyo). I also changed how often it updates, and got it to display now, today and tomorrow's temperature with a description from tomorrow's temperature (click to expand):


 Click OK when happy with the setup of Aniweather - you will need to restart Timberwolf to see all the changes.

I will focus on just one more Timberwolf Add-On today, called WorldIP.

This addon adds a country flag next to the URL of any website you visit. If you move your mouse over the flag icon it then allows you to see at a glance more information which country, state and city the website you are viewing is hosted, and some other technical information like IP addresses, Datacentre location ,etc. I have showed two examples from the US and Japan below:


It goes much further than this too - if you right click on the flag you get a large number of options to play with. I configured the options in the menu to not display my external IP address but by default it shows this as well:


As I have said before there are so many add-ons to play with in Timberwolf on the X1000. Try some of them out!

I'll move on to play with other stuff now on the X1000 as I am happy with the setup of Timberwolf now, but if you find some other really good add-ons please let me know!

Thursday 19 July 2012

Timberwolf RC1 Web Browser on X1000

Today I wanted to take a closer look at the recently released Timberwolf Release Candidate 1 on AmigaOne X1000.

Timberwolf is a port of the commonly used Firefox web browser (used on PC's and Mac's) for AmigaOS 4.1 Update 4 or higher.

Previous versions have been beta versions and had plenty of bugs and issues. An earlier beta version was included with the X1000.

This latest Timberwolf RC1 version (available on os4depot.net) is the first release candidate version and as such is more stable.

Please note that if you have any previous version of Timberwolf installed (most likely in sys:internet/timberwolf), you need to delete the Timberwolf folder (or rename it) before extracting the new version. You will have problems if you extract the latest version over the top of the old version folder.

So, let's take a look at Timberwolf RC1, what it can do, what it can't do and how to set it up! Here's a view of Timberwolf in action on my X1000:


One of the big things about Timberwolf is the arrival of the first HTML5 compliant web browser for AmigaOS 4.

This means that this blog entry is the very first time I can upload my blog entry using my X1000! Very happy! Previously the Blogger upload image function didn't work which stopped me from using the X1000, but now using Timberwolf I can do it all from my Amiga!

But how compatible is it to HTML5? To find out I used the HTML5 web browser tester website at http://www.html5test.com . I am sure there are other test sites as well. The result as shown below:


Interesting is that the test believes Timberwolf is actually Firefox v4.0.1 and knows it is running on AmigaOS.

The next shot below from the same website shows a comparison score of other common web browsers currently in use on PC and Mac today using the same test (click to expand):


The result of 283/500 for Timberwolf makes it more HTML5 compatible than Internet Explorer 9 (currently used in Windows Vista/7) and not far from Apple's Safari web browser.  Not too bad at all!

Let's take a look at some common websites from around the world rendered in Timberwolf RC1 on X1000:

News.com.au (Australia):


bbc.co.uk/news (UK):


cnn.com (US):


 DW.de (Germany):


ppa.pl (Poland):


UEFA.com (Europe): 


I have to say it seems to render most websites I have tested so far quite well. The exception is Japanese websites, which I guess is due to a lack of suitable Japanese fonts included in Timberwolf, although it seems to support Japanese from looking at the settings. At the moment viewing yahoo.co.jp looks like the screenshot below.

Yahoo.co.jp (Japan):


Note that in this screenshot I am also running Moji sidebar and Rikaichan add-ons for translation from Japanese to English which both work well in Timberwolf.  

Update 21/7/2012 - I have now fixed this problem viewing Japanese (and Korean) websites by copying Japanese and Korean true type fonts from my Windows 7 installation to the sys:fonts/_truetype folder on the X1000. I can now view this webpage and all Japanese websites I tested correctly!

Now, if you want to use the Bookmark feature in timberwolf you need to manually install a DOSDriver called RANDOM. Weird, but there it is - only on Amiga would we have a RANDOM DOSDriver with an 8-Ball icon!

DOSDrivers are mounted when AmigaOS4 boots and mounts essential devices like AUDIO, AUX, PIPE and virtual DiskGUI CD/Floppy devices like ICD0 and IDF0.

So how do we do this installation of the RANDOM DOSDriver?

To start with, if you go to the System:Devs/DosDrivers folder on the Workbench, this is the live DOS Drivers folder. Now, while leaving that DOSDriver window open, also go to System:Storage/DOSDrivers, which as the name implies is a storage location for DOSDrivers that are not currently being used.

You should now see the RANDOM 8-Ball icon (shown as the bottom window in the screenshot below) which needs to be moved to the live System:Devs/DOSDrivers folder (shown at the top of the screenshot below):


You will need to reboot for this change to take effect. If you notice any stability issues on AmigaOS4 after this, then simply reverse the process to move the Random device back to the Storage/DosDrivers location and reboot once more. I personally found response of AmigaOS4 laggy and slow after putting the Random device in place - since I don't need to use Bookmarks I don't use the RANDOM DOSDriver and can't comment on how well it does/doesn't work. Perhaps this will be improved in the next version of Timberwolf - it is the first release candidate after all.

While on the negatives, I previously commented on this blog that YouTube videos are slow, audio choppy and basically unusable on Timberwolf, and only playable at all if using the HTML5 trial mode of YouTube. This is still true unfortunately, so I still need to use MUI-OWB Web Browser to stream YouTube videos.

Timberwolf also can't play any Flash video files, commonly still used on news websites...mind you, no other Amiga web browser can do this either!

Having said all that, Timberwolf offers plenty of extra functionality ported from Firefox - most exciting is the add-on functionality, which allows users to add additional features to the browser to, for example, enhance the performance and control use of websites and downloads better.

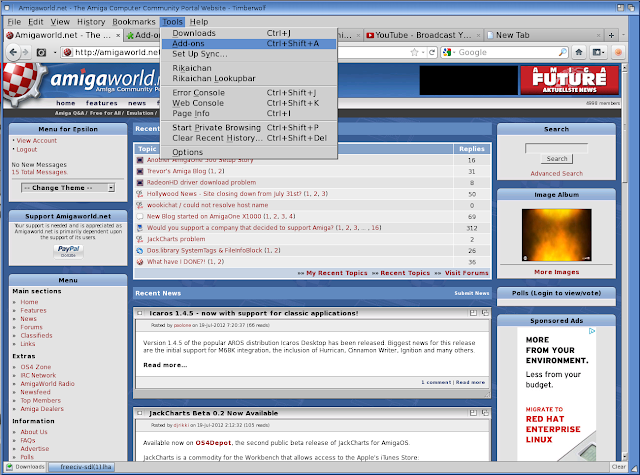
You can access Add-ons from the Tools Menu, and select Add-ons, as below:


You will then get the Add-ons page which allows you to search and install add-ons for Firefox as shown below:


I should note that not all plugins will work with Timberwolf - a similar problem exists for Firefox on PC, Linux and Mac too. I will focus on a few add-ons I have tested and I know work on Timberwolf.

The first add-on I want to look at for Timberwolf is Download StatusBar 0.9.10. You can get it from https://addons.mozilla.org/en-US/firefox/addon/download-statusbar/. I noticed that for some reason it is not on the add-on search results like the others shown here so please use the link above. This add on allows you to see and control your downloads much more easily in Timberwolf. It displays a status bar at the bottom of the Timberwolf page that shows any downloads in progress or completed, like the screenshot below:

 As shown, the download files in progress are shown graphically in the status bar, which you can mouse over to see more detail showing where the file is being downloaded from, where it is being saved, amount downloaded, time left and percentage complete. You can click on an individual download to pause it, and click it again to resume.

In addition you can click on the Downloads button on the left of the status bar to reveal a menu that allows you to change the options, to pause, resume or cancel all downloads!


I have to say I love this functionality in Download StatusBar and it has got me more excited to try out some of the other add-ons now!

Next, I tried Snapshoter 1.01. As the name implies, it snapshots the current website you are on to a image file on your hard disk. It adds a camera icon next to the navigation bars in Timberwolf as below:


If you click the down arrow next to the Camera icon you get a menu to choose whether to capture a complete page, the visible section only and to access the options:


The options for Screenshoter allow you to change the default action when pressing the Camera icon, and to change where the pictures are saved to and the file format (PNG, JPEG) and hotkeys mapped to perform a screenshot:


Here is an example Screenshoter image export from Timberwolf using abc.net.au/news as an example. As a guide, it takes about 5-10 seconds to grab, depending on how big the web page is. This one is from the main page of abc.net.au/news (click to expand):


 Looks great!

The last one I will look at today is Download Youtube videos as MP4 and FLV 1.4.3. This adds a Download button to YouTube videos in timberwolf to allow downloading of videos to your hard disk to playback separately using MUI-Mplayer.

Unfortunately Timberwolf does not offer an option to stream the content from the Youtube website directly through MUI-Mplayer, as I can do with MUI-OWB (I detailed in an earlier blog entry how to do this). So I will continue using MUI-OWB for YouTube streaming. But, back to downloading Youtube videos using the add-on.

Screenshot below of YouTube with video that can't be played back in Timberwolf, with the download option available with a number of formats selectable depending on the source video options (click to expand):


Once selected I then select whether to save the file only (this works), or choose something like mplayer to play back the file after downloading. When I tried to the option to open with mplayer I note that this doesn't work - I get an error playing the file (probably because mplayer is not called correctly from Timberwolf)

You can tick the box to do this option automatically so you don't have to see this prompt every time:


Because I am using status bar add on I can then see the download in progress...


And after running MUI-Mplayer I can play the downloaded mp4 YouTube video on the X1000. Really enjoyed this episode:


One thing worth mentioning is that Timberwolf remembers what websites you had open in each tab when restarting the browser after installing an add-on and will put you back where you were before the restart - nice feature!

There are plenty more Timberwolf add-ons to explore and I could spend many more pages on it - my suggestion is to try them out yourself and see what works well. Please let me know any good ones I can add to mine!

Speed of web page loading is good - it is a little bit slower than MUI-OWB but it is getting better and better and the HTML5 compatibility makes a difference!

I hope you this taster gets you interested to try out Timberwolf RC1 for yourself on your X1000!

I have now added a second blog post with some more Timberwolf features here!