Continuing on from Part 1 here, I am installing AmiKit 8.1 Real on my Amiga 4000T. I am pleased to report I have made some great progress overnight and now running AmiKit 8.5 Real!
Where I left this in Part 1, I had just got AmiKit 8.1 Real installed and booting on the Amiga 4000T. Please go back and review Part 1 first if you haven't read it yet as I am just continuing onwards from that post.
I have a Mediator 4000T PCI bridgeboard installed on this Amiga 4000T, which means I need to install the drivers for it and the various PCI cards I have installed - Voodoo3 gfx card, SoundBlaster 128 PCI, Realtek 8029 PCI card, etc.
It was at this point that I realised to my pleasant surprise that Poseidon USB drivers where all installed, and my Deneb USB was working without me having to do anything! USB sticks and USB drives working. Fantastic!
I installed Picasso96 from the AmigaOS 3.9 CD as it is needed for the Voodoo3 card to work. There are instructions on the Mediator CD that explain the steps here so I won't repeat them here.
I then copied the Mediator files onto a USB stick to install onto the Amiga 4000T - as before I did an assign for the CD name to the drawer I created so I didn't need the physical CD to install it:
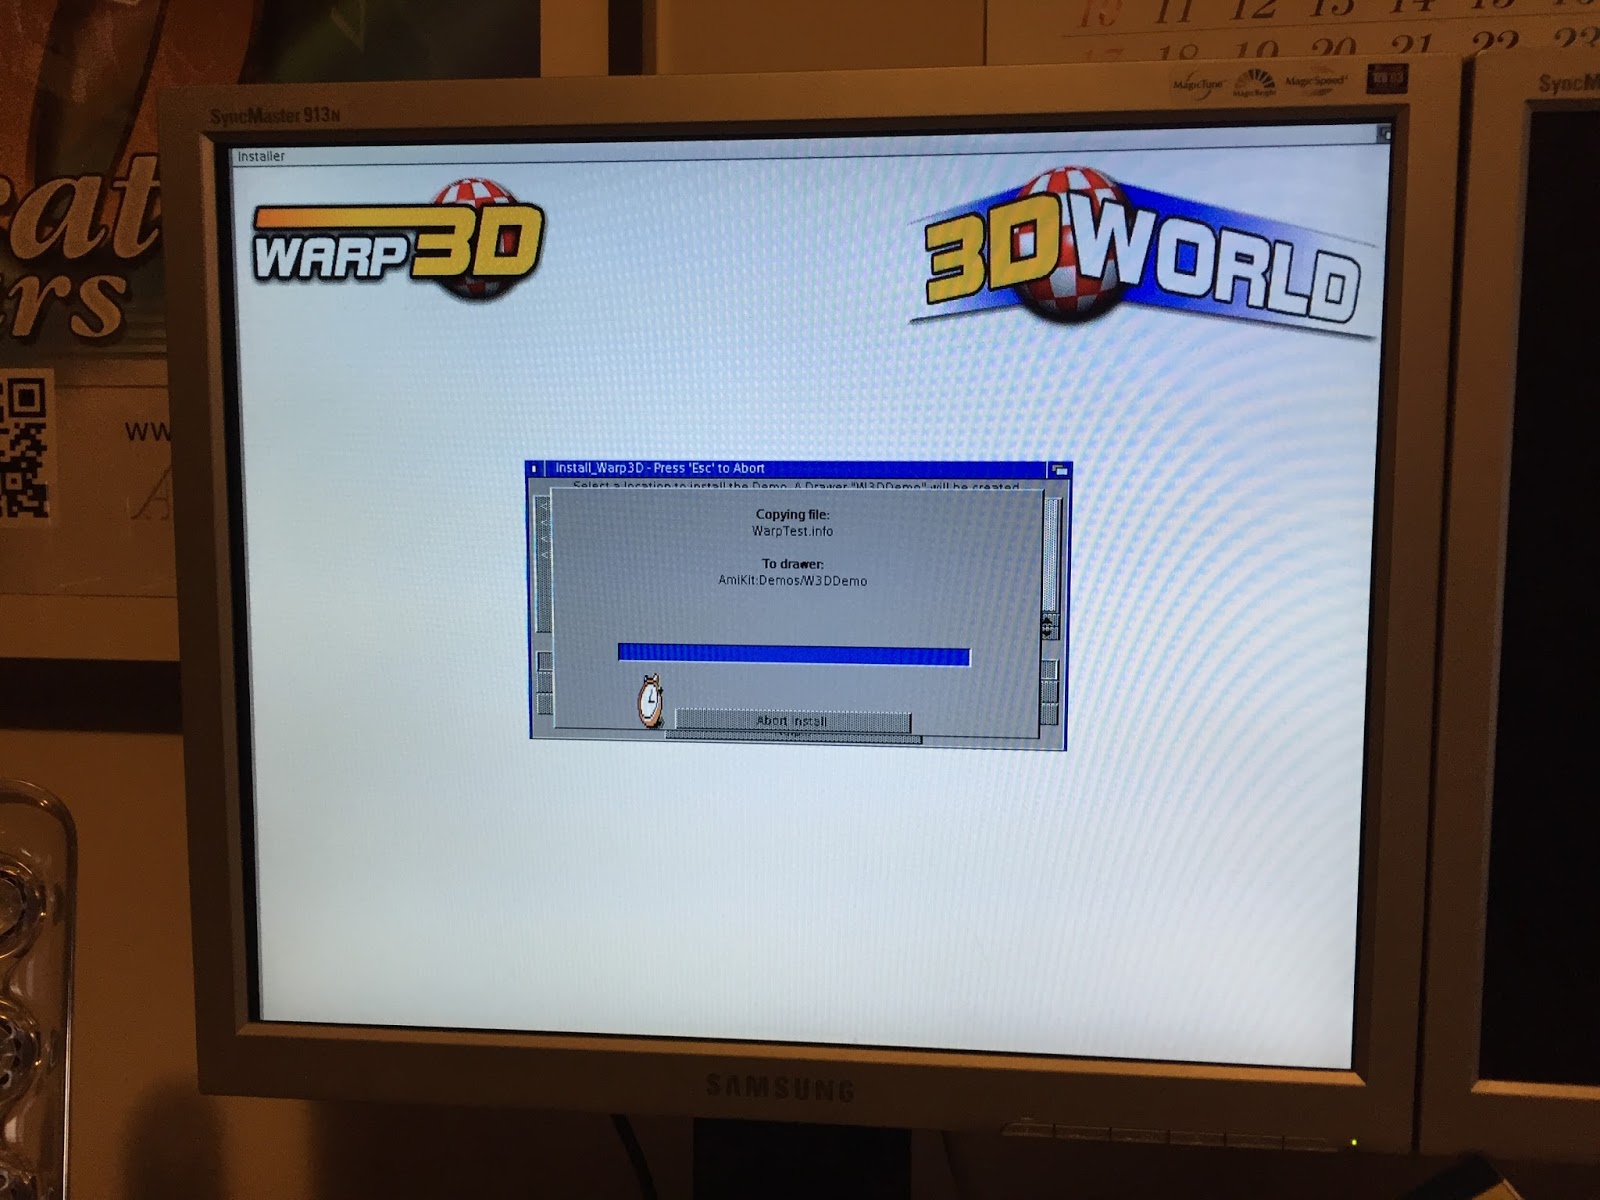
The installation includes the drivers and Warp 3D as well:
I probably should try to use the Radeon 9250 card in the Amiga 4000T at some stage, but for now I want to get things working on the existing setup.
Important thing I found out though is that the CGX drivers included in the AmiKit 8.1 Real installation cause LOTS of problems with Picasso96 cards - specifically you can't see them!
To fix this problem it is important to turn off the CGX_AGA&Birdie stuff, which is done via an icon in the tools drawer on the Amikit drive called Disable_CGX_AGA&Birdie:
There is a Recover_CGX_Aga&birdie program here also to put it back again.
With the Mediator installation completed, I setup the Voodoo card as per the instructions on the CD. Once rebooted I could see the Voodoo card and resolutions in the ScreenMode prefs - excellent:
Testing 1280x1024 (native resolution for my TFT screen) works great from the Voodoo3 as expected:
I then save the settings and reboot - some work to do on resizing backdrops, etc, but it works - AmiKit 8.1 Real is now running on the Voodoo3 at 1280x1024:
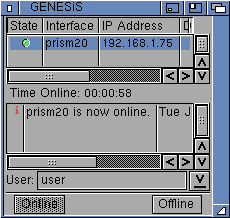
I next set up the network settings via the Genesis wizard in the Internet drawer, selecting the FastEthernet.device driver and fixed the backdrop:
With internet active I then ran the AmiKit Live Update program, which downloads 8.2, 8.3, 8.4 and 8.5 updates from the internet to self-update 8.1 to the latest version of AmiKit.
This takes a long time so now is a great time to have dinner and watch some tv - I did! :-)
Eventually the downloads complete and reboot is needed. The updates then start installing, which also takes quite a while.
I noticed the GL Matrix screensaver is enabled while I was waiting for the updates to finish installing - an oldie but a goodie:
Updates all done, the system reboots and now we have a fully up to date AmiKit 8.5 Real running on the Amiga 4000T!
At this point I could switch to SGrab to stop taking grainy iphone photos of the progress:
A shock to me was the amount of memory AmiKit 8.5 Real uses! I have 90MB of memory on the A4000T but after updating to 8.5 I now only have 28MB of memory left!!!
This is an issue for running my demos, so I need to put more memory into the machine or work out somehow to improve the memory usage. Tempted to take the Cyberstorm with 128MB from my A4000D to fix it permanently. I noticed I can't buy the Zorro ram expansions from anywhere (out of stock) so I have to run with it.
That said - it looks great as it is.
Here is iBrowse running under Amikit 8.5 Real:
Icons look terrific, but certainly use a lot of memory for the more busy drawers:
The Shell also looks a bit different - setup with tab completion, etc.
There is a lot of software to try out on the AmiKit 8.5 Real base installation - I will have some fun trying them out.
Microgolded is installed too - I actually own a purchased copy of the full GoldEd IDE, so I will install that soon - but for now it is nice to see a familiar default editor again:
Picshow is quite impressive too - I like it. Having said that it also chews through the memory - down to 12MB free!
Eagleplayer is also nicely setup, with a nice remote control I can put in the bottom left corner to manage it, with a few tunes already there to enjoy.
Here is the Prefs drawer:
I needed to modify the AHI prefs to use the SB128 rather than Paula for audio out. I also use the Mixer application from the Mediator installation, as I feed the output of the paula rca connections into the line in on the SB128 so I only need one audio out to the speakers to here the audio from both.
GUI Preferences screen:
I needed to change the Locale preferences to Australia of course and date settings needed adjusting accordingly:
At this point it was midnight again so I ran out of time to do any more work, but I am pleased with where I have got to. Still need to set up the CD drive, get my large hard disk working with it, install more applications too! More to come!
Showing posts with label genesis. Show all posts
Tuesday, 22 March 2016
Tuesday, 6 May 2014
Wireless Network card on A600
Today I am installing a wireless network card and setting up internet access on the Amiga 600 as part of my upgrade project.
I am using a PCMCIA wireless LAN card for the setup of the Wireless network access on the Amiga 600. The card was chosen with great care, to ensure it was a model compatible with the Prism2v2 driver, which is downloadable on www.aminet.net. Please review the list careful in the readme guide to ensure you get the correct wireless card model number.
In this case, mine is an Agere chipset model under the rebranding, which is compatible with the prism2v2 driver. this card was brand new when I bought it recently, complete in original packaging:
So, let's get to work setting up on AmigaOS3.9 on the Amiga 600.
The Prism2v2 driver introduced to Classic Amigas the ability to connect them to a WPA/WPA2 secured wireless network, instead of the far less secure WEP secured wireless networks used a number of years ago. Take care not to download the older prism driver which is also there.
Once you have downloaded the prism2v2 driver and extracted it to RAM: you should see the following:
The Manual is an AmigaGuide that explains the installation process. I will cover it in some detail here. If you find this configuration too daunting, then you can purchase the AmigaKit wireless card kit for Amiga600/1200, which included their EasyNet software, and an installer which walks you through the setup process.
Having said that, the setup is not difficult. when running the installer for the Prism2v2 software, it will prompt you for your wireless connection settings to generate the necessary configuration. Please make sure you get this information right the first time. Fixing it afterwards involves a bit of work.
You are prompted for the SSID for your wireless connection:
Of course it then prompts for your WPA passphrase:
The installer goes away and generates the keys needed for WPA connection - as per the below it does indeed take several minutes to do so please be patient:
Installation complete:
Next, we need to reboot.
When rebooting a new program called C:WirelessManager (inserted by the installer) is run at the end of the s:user-startup file to initialise the wireless card. If it is working then you should see the status lights on your wireless card turn on at this time. It is important to ensure the card is inserted into the Amiga 600 PCMCIA slot before turning it on so that this process works.
PCMCIA Hotplug while running is possible (with a reboot to initialise it) but not really recommended - it is a tight fit for the card in the A600, and better done with the power off so the hard disk is not potentially affected.
After that we then need to configure the TCP/IP settings in AmigaOS to use the new network card.
If you run AmigaOS3.1 then you really should get AmigaKit's EasyNet package, which includes their EasyNet GUI driven TCP/IP stack - I am aware that there are other (free) alternatives, but they really suck to install and configure by hand yourself.
Under AmigaOS3.9 it has the Genesis TCP/IP stack included with the operating system (as an optional installation). Please install it first, if it is not installed already.
Under the SYS:Internet folder, you should then see the Genesis folder. We want to run the GenesisWizardRA program - if you have already configured network settings in here previously, you need to modify them using GenesisPrefs. I am not covering GenesisPrefs here, I am just assuming a new network configuration needs to be created using the Wizard:
When running the Genesis Wizard, it then asks if this is a Modem or Network connection. Select Network and click Next:
Next, we need to choose the network card we are going to use (referred to here as the SANA-II device). Click on the icon next to Device: to choose a device:
Choose prism2.device and click OK.
The Prism2 device should now appear in the Wizard in the Device section. Leave the Unit set to 0. Click Next.
The next prompt asks if your sana device (network card) needs a special configuration - select No and click Next:
It will then try to send a BootP request through the network card. In my case, it didn't pick up a DHCP address. Your mileage may vary! For me, I put in the IP address and gateway router addresses manually:
Next you need to put in the DNS (domain Name Server) IP Address for your network. You can also specify a domain suffix (eg. home.local) if you use it in your network at home.
Configuration is now finished - click Done to complete.
Next, we need to run GenesisRA from the Genesis folder. This will display a Genesis status window as per the next screenshot, in a non-connected state. Click on Online to connect the network:
For me, it worked successfully, and went online:
Next, I downloaded and installed AmiSSL v3 from AmiNet. This is needed for the AWeb web browser to display secured websites, which are very common nowadays.
Once downloaded and extracted to RAM: it looks like this. Just run Install-AmiSSL:
I will not show all screens in the install, just the relevant items. Below is the screen prompting which CPU you have - in my case the 68030:
Make sure you allow the installer to add AmiSSL: to your path:
Installation completed:
You then need to reboot for AmiSSL to work.
After the reboot, I ran GenesisRA again and went Online. I then ran AWeb web browser from the SYS:Internet/AWeb folder, which is included with AmigaOS3.9. For AmigaOS3.1 users you can download AWeb from Aminet.
Please remember that we are running a 8 colour workbench, and that Aweb has limited HTML support, so many websites do not render correctly and look terrible.
For me, the main reason to use the web browser on the Amiga 600 is to quickly download software from Aminet direct to the Amiga 600, so I went to Aminet first:
I then tested web browsing and playing a MP3 via the MAS Player I set up previously, and it works great!
You can see it takes a decent chunk of the 32MB FAST memory to run these programs, but still have plenty in reserve for other things too!
As above, I started downloading WookieChat (IRC Chat client) to try our IRC on the Amiga 600.
The install is straightforward so I won't show it here:
Once I setup the Amigaworld sunday chat IRC channel in WookieChat, I dived in...
Unfortunately, given the time difference when I connected, no one was there. While I was waiting I played some more Mp3's on the MAS Player. Loving it!
So now the Amiga 600 is connected to the network (and internet) via Wireless network card!
There are plenty more internet programs still to install and play around with of course, but the goal was to get it up and running initially!
It turned out to be much easier than I expected to get it up and running.
As a side note it is possible to automate the connection of the network via command line from the s:user-startup. Given the CPU overhead on an Amiga 600 though, I think it is better to launch it only when I need to use it.
For now I am very happy with the progress of the Amiga 600 upgrade - it is a terrific machine now with all these upgrades now in place!
Subscribe to:
Posts (Atom)