Saturday 20 February 2016

New case for AmigaOne A1222

Since I received my AmigaOne A1222 it has had a temporary home in my Sam 460 tower case, but that was never the final location planned. I needed a new case for the A1222 and recently I came across a very cool Mini-ITX case that I believe suits the A1222. The case is a In Win H-Frame Mini-ITX, and It arrived this week. Build time!


The case came in a neat box, and given how small it is, it is not your average pc case box:


On opening the case I was greeted with the glass panel for the case, carefully positioned to avoid damage, the manual and tools and accessories to build the case:


Once free of the packaging, the case looks great and very small:


The panel covering both sides of the case are removable by unscrewing the four hex screws holding them in, which look rather nice in my opinion:


The case itself is thermal material designed to direct heat away from the case, and it does this with a design that means it is quite an open case, which makes it look very different from the usual cases:

I had to pick red for the case as the A1222 will be running AmigaOS 4.1 Final Edition. There is also blue and green colours available, which use a different colouring for the thermal structure of the case that matches. More details about the case are on In Win's website here.

It is almost like someone knew about NG Amiga when making this case - Red for AmigaOS 4.1, Blue for MorphOS, Green for AROS :-)

It comes with a 180W power supply, and this is important as we need a reasonable amount of power to power the A1222 and all the associated hard disks, graphics cards, dvd drives, etc.

Once I open the red cover, I can see the mini-itx bay and associated cables for connecting everything in:


This case has covers on both sides. The other side has locations for 2 SATA hard disks and a Slim DVD drive. You will note that the SATA power and data cables are already in position, ready to slot the drives straight in.

This method of placing is clever, since undoing the panels on both sides makes all components easy to change out in what would otherwise be a hard case to work on:


Given the Slim DVD requirement, I purchased a Silverstone DVD-R slim SATA drive to fit into this case:


I had to go with slot load obviously, for extra coolness :-)


Here is the DVD drive installed in the case. Literally slide in as all the connectors are already in the correct position out of the box. No screws needed for the DVD. Love it - easy to do:


Next up was the hard disk. Now I took a 320GB Sata 2.5 Hard disk I used to use in another computer for this build. I connected to the A1222 in the old case and prepped the hard disk and transferred all the contents across from the 3.5 Hard disk I was using before.

Here is the 320Gb SATA disk installed in the system. (The hard disk does need screws to secure it which are included)


Note the position of the hard disk above, as the other data hard disk slot cabling is not long enough to reach the data port connectors on the A1222. It needs a SATA data extender cable if you want to use the hard disk in that position.

Keeping in mind that the A1222 has 2 SATA ports, the other connection will not be used anyway, so it is not a big deal.

Flipping the case over, I now start work on fitting the A1222 board inside:


As you would expect, it is a snug fit in this very small case, but everything does fit well. The case is designed to make cable routing around the outside of the board easy to accomplish, which is important if you plan to use the glass cover to show off your build!

I also need to install the PCI-e graphics card into the PCI-e graphics slot on the A1222. My Radeon 5450 PCI-e card I was using for the A1222 needs to be slimmed down first to it's low profile form to fit in, which is easily done:


Here it is, installed. As you can see you can only install a low profile single slot graphics card in this case, but that is perfect for the A1222 as it has only one PCI-e slot:


View of the back of the system case, showing the A1222 board and PCI-e card installed:


One more detail needs sorting out though - the case comes with two front USB3 ports only, with a corresponding USB3 connector to connect to the motherboard. However the A1222 motherboard has a USB2 port connection, which means I can't use the front ports as it is. (only the rear 2 USB ports)

I picked up a USB3 to USB2 port converter to solve this problem as shown below:


So now I can connect the front USB3 ports to the A1222 motherboard:


With everything connected up, I put on the optional glass cover to show the system off:


Alternate view from the top - note the case includes a small grill at the top to stop dust falling on the motherboard:


I then put the red cover back on, as I prefer it this way:


View of the back with the red covers on - you can see how open the case is:


First power on and amazingly (for me) the system worked straight away - all present and correct.


With Debian 8 Linux booting up fine on the new hard disk, I could breath a sigh of relief. I was most worried about the hard disk transfer process not working properly, but fortunately it did work fine.


I put in a Lizardking cd to test the new DVD drive, which I pleased to say works great:


The USB 3 ports on the front also work fine on the A1222 with the converter I installed:


The A1222 system is whisper quiet in the new case! I am also pleased to report no issues with power supply - 180w is fine for this configuration.

I am very glad this week to get the AmigaOne A1222 system into an appropriate Mini-ITX case that will be it's permanent home!

I still have to put the sam 460 back into it's original system, but I think this is enough builds for this week!

Saturday 13 February 2016

Google Drive for AmigaOS4.1 on X1000

Today I want to take a look at the recently released Google Drive for AmigaOS 4.1 Final Edition. I decided to try this out on the X1000.


For those not familiar, Google Drive is a cloud based file storage solution for saving/retrieving/sharing of files from the internet to/from any computer that runs the Google Drive application, including smartphones like iPhone/Android, iPads, Windows PC, Mac OS X computers and more.

Recently there has been releases for Google Drive for MorphOS and AmigaOS 3.x systems, and finally we now have Google Drive for AmigaOS 4.1 Final Edition! The author of this program is Norbert Kett. You can download the program from here.

The program requires registration of 10 Euro to the author (see the readme in the archive for details) to unlock all the functionality. I decided to try it out as it is provided on Aminet here, to make sure it works well. I am pleased to say it does!

The archive contents is below - note that there is no installer so I extract to RAM first to do a few things for the installation.


Fortunately the instructions in the readme are clear and explain the process well.


Here is the Google drawer:


Update: Note that I am running a later Patch 7 release of Odyssey 1.23 web browser to fix memory leaks and Google login to blogger. The updated patches are an ongoing patch effort which you can follow in the Amigans thread here. It includes the download links for the Patch 7 (just the Odyssey executable to overwrite the original file) and newer releases as they become available. I have not tested earlier versions of Odyssey for compatibility with this next step.

I copied the url from the readme into the Odyssey web browser to allow the Google Drive application on the X1000 to access my Google profile:


Once I allow it, I get the client code that we need to paste into the _client_code file in the Google drawer.


Here is the code pasted in:


Note that for obvious security reasons I blurred the code. I also regenerated the code afterwards to a new code in case I missed it somewhere.

Having saved the _client_code file, I then copied the Google drawer to the DEVS folder on the System: drive:


I then added the assigns needed for Google Drive to mount under AmigaOS 4.1 into the s:network-startup file using Notepad:


 After a reboot I could then open a shell to mount the Google: drive mapping manually to test if it works - and it does!


I can see the contents of my cloud based Google Drive from The X1000 - fantastic:


Now that the drive is mounted, I can see the icon on the Workbench and can view the contents as per any other drive on AmigaOS 4.1 Final Edition (Don't forget to view all files first):


You can open the files directly from Google drive but there is a delay while it traverses the network, which depends on the size of the file.

I then copied across one of the files to my X1000 which worked perfectly:


As a final touch I then set the Google.mountlist to activate the drive on startup of AmigaOS 4.1 Final Edition:


Now the drive is available everytime I boot the X1000.


Since it works so well, I will shortly arrange to pay the 10 Euro to the author to unlock the functionality to copy files to the drive (without this, the drive is read only) and export functionality.

I am very glad to see this software available for AmigaOS 4.1 Final Edition in 2016!

Thursday 11 February 2016

MIST Minimig AGA system has arrived!

This week I received my MIST system. This system can emulate Classic Amiga AGA system in FPGA (along with other systems like Atari ST, C64, CPC and more). I was very keen to try out the first FPGA Amiga 1200 AGA compatible system!


I got the MIST system from Amigastore.eu, located in Spain. The MIST is actually made by Lotharek in Poland, the same guy who makes the Furia A600 Accelerator and HxC floppy emulator cards for Classic Amiga systems.

In the case of the Classic Amiga, MIST uses the MiniMIG AGA core to run as an Amiga 1200 AGA system. Until now I have used the original MiniMIG 1.1 ECS system. Here are the two systems (MIST and Minimig) side by side:


Here are some close ups of the MIST system I received:


Like the original MiniMIG, the MIST has two Amiga joystick ports for plugging in Classic Amiga Joysticks.

On the other side are two MIDI ports for the Atari ST core FPGA implementation which also runs on this system.


On the front is three activity lights, an SD Card slot and three buttons


Flipping it around we have a VGA port, 4 usb ports (for connecting normal USB keyboard and mouse), a usb power connector and an on/off switch.


On the bottom is Lotharek stamp on the unit!


The MIST came together with the Lizardking CD in the same week. I also got the  latest Amiga Future magazine direct from the publisher:


While I was setting up the MIST system I relaxed to some Lizardking 90's Amiga tunes from the CDTV:
 

I also got a redeem code to download the MP3 / FLAC/ OGG versions of the album online which was very helpful to add to my ipod, etc. For now though I was happy playing the CD on my CDTV:


The MIST system can be powered from any powered USB 2 port - I used by powered USB hub as a power source:


I opted to order my MIST system with a 32GB SDCard, which thoughtfully had the Minimig AGA core loaded and ready to go with some things to try out:


Here is the initial MiniMIG boot screen on power on of the MIST:


As you can see above, it is a standard Amiga 1200 AGA system with a 68020 processor, 2MB chip and 4MB fast memory.


I booted into the Workbench 3.1 virtual hard disk file environment which is pre-configured and included on the SD card:


A number of AGA games are installed on the hard disk included on the SD Card, ready to try out:


I picked the AGA games to try out first since I was keen to try out the AGA core.


Haven't played these games for a few years - it was nice to try them again - here is Disposable Hero CD32 version:


Worms Director's Cut (AGA only) is one of my favourite Classic Amiga games. When I bought the boxed original game back in 1998 I was so glad to have a version of Worms only available on Amiga, created by the original Worms author.


As with the original Minimig, pressing F12 on the keyboard brings up the options:


There are a few more options since the original Minimig core, and some familiar ones too:


You can still adjust the CHIP memory and Fast memory, and slow memory too, which is relevant if using the Minimig ECS core with Kickstart 1.3 for older games/demo compatibility.


You can adjust the Fast memory from 0MB, 1MB, 2MB, 4MB and 24MB memory! :-)


You can also adjust the filters, scan lines etc for that authentic Amiga display feeling!


I have to admit I would like something that removes the flicker from the Amiga Hires Interlace screenmodes - that annoying interlacing functionality is reproduced too well! These screenshots are running Workbench 3.1 in HiRes no interlace.

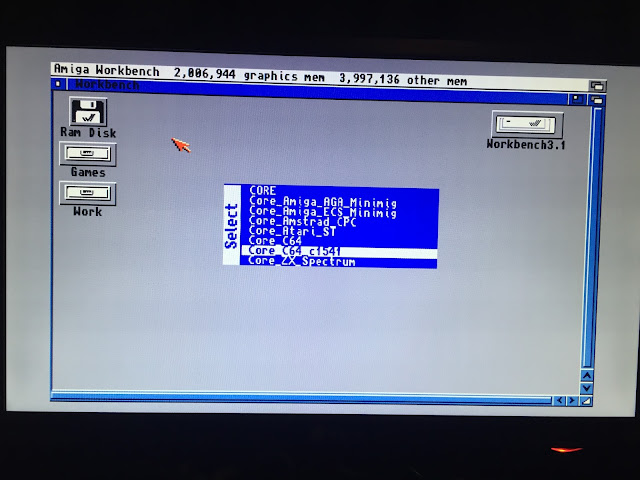
You can also change the FPGA core from this menu to C64, CPC, Atari ST or other cores you may have installed on the SD Card. It will then reboot into those cores.


As you can see there is Amiga AGA, Amiga ECS, Amstrad CPC, Atari ST, C64 and ZX Spectrum cores.


In addition, there are also cores for the following systems on the MIST:
  •     Atari 2600
  •     AMIGA Minimig Core
  •     AMIGA AGA - Minimig-AGA core
  •     Atari ST/STe and Mega STe - Mist core
  •     Apple II+
  •     Arcade
  •     Atari 800
  •     Colecovision
  •     Commodore C64 - PGA64 Core
  •     MSX
  •     NES (Nintendo Entertainment System)
  •     SMS (Sega Master System)
  •     ZX Spectrum 48/128
  •     ZX01/ZX81
For those curious I quickly fired up the Atari ST core (as it was included on the SD Card), but not being familiar with the Atari ST don't really know how to use it! Sorry to any Atari ST fans reading this!


The C64 core didn't do much when I tried it out:


I found out that the C64 core on the SDCard was quite old, so I downloaded the newest one (which supports C1541 *.d64 floppy disk files) from the Github website for FPGA64, renamed and put it into the root of the MIST SD Card using my Mac - the contents of the MIST SD Card are as below:


When I booted up the MIST again, I then selected the new Core_C64_c1541 core using F12 menu and selecting the new core:


One automatic reboot later and....a Commodore 64 system running via FPGA on my MIST!


There are some games included on the SD Card. I copied my own library of titles which I also use on my 1541 Ultimate II on the real C64. I mounted the Wizball game as a .d64 image and proceeded with the usual game loading procedure:


The C64 core does not have a fast boot loader to speed up disk loading times, so it is as fast as the real thing - eventually though the title screen appears:


I am pleased to say the beautiful title music and game runs well in the small testing I did:


I will certainly try out more of the other cores soon!

I then switched back to the MiniMIG AGA core and ran some games and demos from ADF disks off the SD Card.


First I had a go at Agony - a fun game:


Next I copied across my Amiga 600 hdf files from the original MiniMIG SD card and tried them out on the MiniMIG AGA configuration.

There is some great information on the MIST github website on how to prep Amiga hard files for use with MIST and also how to transfer files to the hard file using FS-UAE. The website is here.

I can modify the hard disk files used from the F12 menu under Hard disk settings:


Interestingly the slave drive can be specified as a hardfile (hdf), SD Card, or a SD card partition!


 I select hardfile and selected my Data.hdf file:


You need to save this configuration in this menu if you want it to use it each time. Otherwise on the next reboot of the MIST it will revert to the previous configuration. This functionality is very useful to testing out changes without committing to them permanently.

This Amiga 600 hard file booted up no issues on the MIST, and the extra memory in the MIST really helps here as I can now run applications and whdload games without running out of memory. That was an issue on the original MiniMIG.


You'll note above that the pull down separate screen to reveal the Workbench works fine on the MIST - big tick there :-)

Playing some modules through Octamed Soundstudio on the MIST:


 Next I had a look at the Amiga Early Start menu which works as you would expect, holding down the two mouse buttons on boot:


Here you can see the AGA "Best Available" option is present, since this is an AGA core.


 I tried out Final Writer using a 256 colour screen separate to the Workbench, which worked great:


Next up I ran Deluxe Paint V, which has AGA 256 colour screen mode support.


Haven't used Deluxe Paint for a long time - it is nice to play with it again - here it is showing some of the sample images included:


I did get some strange messages when it tried to open HAM screens to display images, and not all displayed correctly as a result on those screens - I guess HAM modes are not 100% yet. This core is still in development but as you can see it works quite well already.

Here is Eagleplayer on the MIST, running on Workbench 3.1 hard file initially, exactly how I used it on the original MiniMIG:


Now that I have AGA on the MIST, I can use the nicer GUI skins that EaglePlayer provides:


I could also run my WHDLoad based Amiga demos, including a personal old favourite, "Coma" by Static Vandals:


Razor 1911 also gets a look in, with their 1991 demo production "Voyage" - working perfectly via WHDLoad with the MiniMIG AGA core on the MIST.


I still have plenty more to try out on this new system, but wanted to give you all an idea of what to expect with MIST.

The MIST system is a big leap forward compared to the original MiniMIG and a lot of fun for me already!