Tuesday 26 February 2013

FastCompress 1.4 on X1000

Today I wanted to take a look at FastCompress 1.4, a recently released utility for AmigaOS4.


FastCompress is a utility written by Guillaume 'zzd10h' Boesel and is available for free on www.os4depot.net . The utility allows you to right click on a folder, file (or multiple of each) and then select to compress the selection to a LHA, LZX, ZIP or 7ZIP compressed file, automatically named.

This right click to compress to ZIP functionality is very familiar for Windows owners, but until now was not on AmigaOS4. I previously used a utility called Cranu to do this compression jobs via a GUI but was nowhere near as efficient.

Before you install FastCompress, it is important to install MUI NList.mcc (I already had this installed but it is available to download from OS4Depot.net if you need it).

In addition, Fast Compress also needs a separate piece of software called png_im, which is also available on www.os4depot.net . I didn't have this so I downloaded it! Once downloaded, I extracted the png_im.lha archive to RAM: as below:


I next read the readme, which states I need to copy the png.iconmodule file to LIBS:IconModules/ and reboot:


When I checked the libs: folder from the Shell, I found that (for me anyway) the IconModules folder did not exist. So I created it (makedir LIBS:IconModules), and then copied the file required in the Shell (as below) and rebooted the X1000:


Having done this, I then extracted FastCompress archive I downloaded to RAM: so I could get started installing FastCompress itself:


Inside the extracted FastCompress folder is the installer and ReadMe, which explains how to do the manual installation - although of course I fully intend to use the installer:


So after running the installer, we then walk through the install process for FastCompress. There are a few options to select along the way - so I want to show you what to expect. The first few screens are normal installer screens:


The next screen prompts us for the install location, and default to SYS:Utilities, which is where I installed it:


Then it will ask if you want to install FastLHA, FastLZX, FastZIP and Fast7z. These components are the core of Fastcompress and execute the compression of the files you select. I installed all of them, which is the default option on each screen here:


After that, the installer will ask if you want to integrate the tools into the Right Mouse Button Contextual menu (ie. the menu that appears when you right click on something on AmigaOS4. I answered Yes:


The next question asked by the installer appears to be added if this is an upgrade installation. I answered No here. BTW if you answer Yes it will ask you to remove the lines added into a config file to allow the FastCompress right mouse click to work before you can proceed:


Next it will prompt for what you want the right click Menu option to be called. I aceepted the default name Compression:


Now the installer goes awat any modifies the ENVARC:ContextMenus.cfg file to add in the right click menu options for FastCompress:


The installer then asks if you want to verify the changes made, which I did:


When this config file window is closed, the installer continues and prompts to reboot the X1000 now, which I said was ok to proceed:


After the reboot, we are ready to try it out. First I select Notepad in the Utilities folder, right clicked and select Compression > FastLHA option, as below:


Next I now get a progress window showing the compression progress in FastLHA, the filename title, time to complete, and other details relating to the compression task:


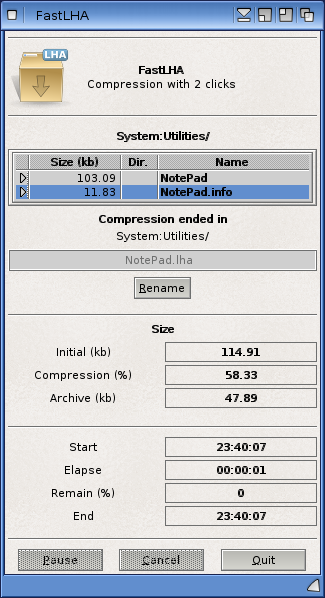
As you can see it took one second to complete. I closed this progress window since the job was completed (there is an option to automatically close this window in the tooltypes of FastLHA).

Looking back in the Utilities folder I now have the LHA file just created:


I then opened the LHA archive and extracted to RAM to run and confirm the file works fine - success!


I then tested other files with FastZIP and Fast7z options on the right click menu, also successful (as below):


So next I tried something a lot bigger, with folders and multiple PDF files inside:


I then extracted the pdf's to RAM and checked they worked ok - all good!


FastCompress is free, fast, works as advertised and is recommended for AmigaOS4 users.

Guillaume has also released some other utilities on OS4depot recently and I will be trying them out too shortly!

Friday 22 February 2013

Dual Displays on X1000

As regular followers of my blog will know, I have a dual video card setup on my AmigaOne X1000 - a Radeon 9250 PCI and the Radeon HD card included in the X1000. The 9250 card is used to play games that require hardware 3D acceleration until the Radeon HD 3D hardware drivers are available.

However, until now I have had to feed VGA and DVI connections to one display and switch modes on the monitor....but no longer (click to expand):


As shown above I can now run my RunInUAE WHDLoad and Amiga system emulations (Amiga 2000 in this case) on one screen, and the usual AmigaOS 4.1.6 workbench on the other. Very Happy - no more switching on one monitor!

The screens in question that I bought are two LG 24" LED screens with DVI, VGA and HDMI inputs, which I picked up from local electronics retailer JB Hifi today for AUD$198 each.

I also now run AmiCygnix 1.3 on one screen and the AmigaOS 4.1.6 on the other. This is very convenient for referencing something in AmiCygnix while using the workbench as below (Click to expand):


While I was in a spending mood, I also took the opportunity to buy the latest Amiga Future Issue 100, new A-Eon USB flash drive and mouse mat for the X1000 from www.amigakit.com, which arrived this week:


The new mouse mat looks quite nice I think!

I guess this is just a show and tell today, but I was keen to show off how well having two screens works on the dual video card X1000! :-)

Sunday 17 February 2013

AmiVNC4 on X1000

Today I wanted to take a look at AMIVNC4 on my AmigaOne X1000.


AmiVNC is an AmigaOS4 port of the popular VNC Server software which allows you to view what is happening on the desktop of a computer from a different computer.

It is available to download from www.onyxsoft.se, under the Utilities heading:


I downloaded it and extracted it to System:Utilities


Reading the release notes that come with it, I found there is a workbench icon for AmiVNC but most of it's functionality exists in the command line version of the program. So I will focus on this.

First I ran amivnc4 -h from the Shell to see the available options. There are quite a few:


First things first - let's set a password to ensure a secure session - for testing purposes let's use 'secret':


This now saves the password and exits the program. It is not needed to enter this parameter again unless you want to change the password.

Next, let's setup AmiVNC verbose mode (-v) so we can see what is happening and specify -s5902 to specify to accept VNC connections on port 5902:


So now AmiVNC is waiting for a connection...

At this point let's switch across to my Windows 7 Pro PC. Initially I tried to use TightVNC client to connect to the AmigaOne X1000:


I didn't change any default settings, and when I click connect I am prompted for the password:


After entering the password and clicking OK, I was greeted with the AmigaOne X1000 desktop on my PC - however there was a big problem with the colours:


So next I consulted Google and found a lot of people hit the same problem using TightVNC and other variants of the VNC client. (Even after adjusting RGB settings, etc)

The author of the AmigaOS4 port provided a link to the VNC Client he used to successfully connect to the AmiVNC4 server. This link is at http://s.guillard.free.fr/OS4/vncviewer.zip

Once I downloaded and extracted this older VNC client for Windows, I was ready to try again:


Once again I was prompted for the password:


After this I was greeted with the AmigaOne X1000 desktop on my Windows 7 PC, all colours correct! (Click to expand):


Below is the VNC client on the PC multitasking nicely with Office 2013 which I freshly installed this weekend on the PC to play around with (click to expand):


The screen update is not that fast from the X1000, but it is usable for common tasks. I wouldn't expect to play games remotely or anything like that!

Great result - I can now VNC to the X1000!

On the AmigaOne X1000, you can see the connection information from the verbose output of the program:


Next, of course I wanted to make AmiVNC4 run on boot so that I can connect to the X1000 anytime I want to from my PC without running the program from the Shell everytime. To do this I added some lines to the bottom of the System:s/user-startup file.

The relevant lines are highlighted while editing the file below in Notepad (Click to expand):


After a reboot I tested connecting from the PC and it worked! Excellent!

I hope this information is useful to anyone trying to get AmiVNC4 working on their X1000!