Tuesday 28 August 2018

Amiga 500 updates

As readers will know, I bought a replacement Amiga 500 recently, and have started migrating my upgrades from the non-working A500 to the "new" one.


This meant breaking the original seal on this Amiga 500 to take a look inside. All things considered and considering it's age, not too bad. Bit of rusting on the top metal shield, but I don't intend to keep that in place anyway.


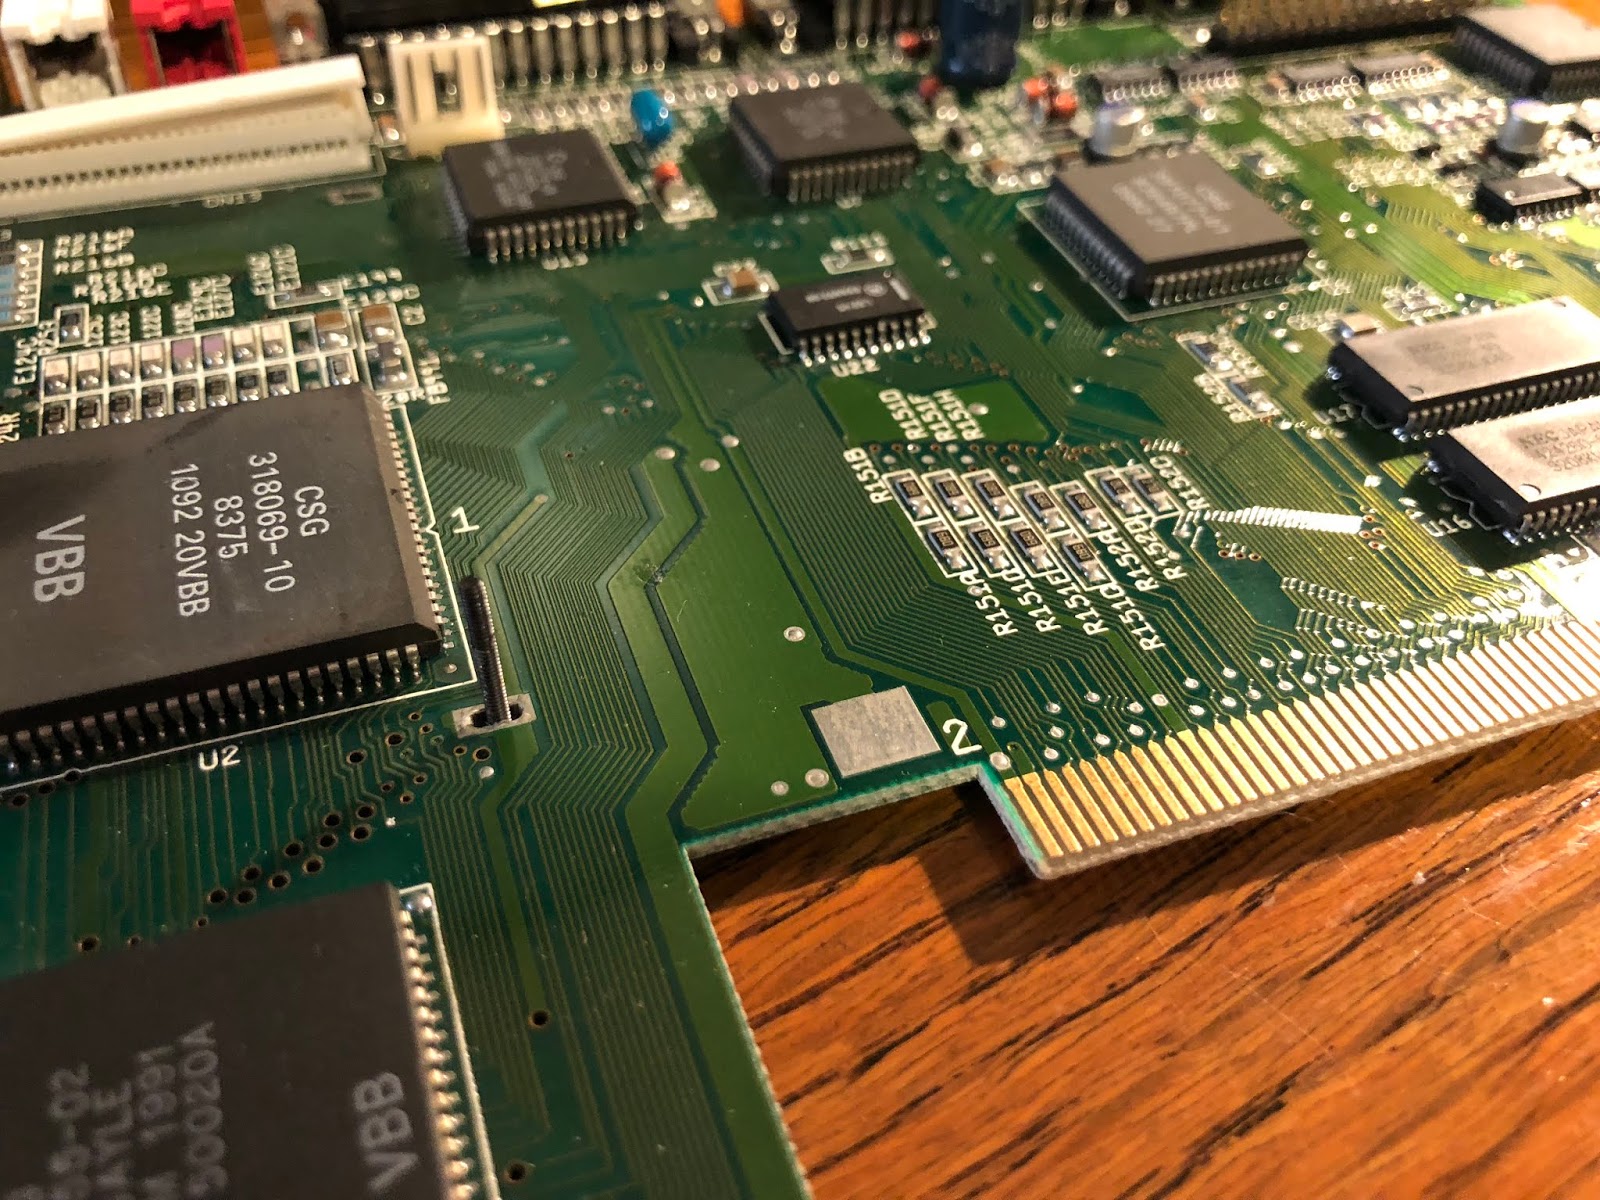
Removing the shield, here is the Amiga 500 board laid bare, with the 512k memory expansion card I got from AmigaStore.eu:


Looking at the revision information on the board reveals this is a Revision 7 board.


On my non-working A500, I previously installed a gotek floppy emulator board with a 3D printed case designed to fit the Amiga floppy opening without any modifications needed to the case:


Here it is installed in place of the original internal floppy disk drive:


Next, I focused my attention to the Even CIA chip, which needs to be removed to install the DF0 selector hardware switch, with the even CIA chip then placed on top of it.


By doing this, I can still boot real Amiga floppy disks using the external floppy drive by flicking the DF0 selector switch to use the external floppy drive port as DF0, rather than the internal floppy drive (now the Gotek).

I tested this using a Workbench 1.3 floppy disk in the external floppy drive with the DF0 selector set to use the external floppy port as DF0 and it worked perfectly:


I then installed the USB stick into the internal Gotek floppy drive, and switched the DF0 selector back to the internal floppy drive. I could then test important stuff works using the gotek, like demos for example:


For those not familiar with the Gotek, it is a floppy drive emulator connected to the floppy drive connector, and can boot Amiga .ADF floppy disk image files from USB stick.

You can select the floppy disks by booting the included selector.adf floppy disk image (set up to use position 000 on the Gotek).

When booted the selector software boots up and allows you to associate gotek display numbers to specific Amiga .ADF disk files, as below:


The annoying bit is you need to take a photo of the screen showing the mappings, since you almost certainly won't remember which number is which later on and need it to know which number to select on the Gotek...


With the Amiga 500 case on, you can see the gotek snugly fits in the floppy drive space without any modifications to the case. It makes me sad to see people cut up the floppy drive opening to fit the gotek in. It looks awful and it prevents installing a real floppy drive if wanted again later on. This solution is much neater in my opinion:


You can insert the usb stick and press the buttons from outside the case to select the floppy disk image number without a problem. Time for more demos! Time for "Sunglasses at night" :-)


Up until now I have been using the AmiVGA RGB to VGA converter plug and my 15khz compatible TFT display.


But now I have installed my Indivision ECS from the old Amiga 500, which gives me a scan doubled de-interlaced VGA output that I can use on my standard TFT screens (normally I use with my A4000T), so I hooked them up. (photo taken from the old Amiga 500 - but the setup is exactly the same)


I also connected my ACA500 expansion card on the left side of the Amiga 500, with an Amiga 1200 A1233 030 33Mhz accelerator from Individual Computers plugged into the A1200 accelerator board slot on the ACA500. This gives me 030 acceleration, twin CF 4GB hard disk support and 128MB of FastRAM from the accelerator!


Alternate view of the ACA500 with the casing (photo taken from the old Amiga 500):


With the casing back on, things are looking great!


The ACA500 also gives me softkick 1.3/3.1 boot support in it's memory without the need to swap the kickstart roms onboard the A500. I can boot in 1.3 or 3.1 mode from a boot selection menu on power up, with plenty of customisation options for the settings for those boots.

I also installed the Subway USB into the ACA500 casing (small space available within the casing next to the A1200 accelerator to fit it exactly!), connected to the A1200 clock port connector on the ACA500. This gives me USB support on my Amiga 500 hard disk setup as well! (sorry I didn't grab a photo of the Subway USB installation)


I also connected the Rys II USB mouse adapter to the A500 so I can use a standard USB mouse with the Amiga (no driver needed) and avoid a mouse pad and regularly cleaning the mouse ball on a real Amiga mouse. At the moment I use a spare USB mouse from my AmigaOne X1000!

I bought the recently released OCS game called Worthy, and put the ADF onto my Gotek to try it out on the Amiga 500. It is a very nice game indeed. I would love to see more new games for the Amiga.


The graphics are classic Amiga, very pretty, good sound and the gameplay is fun too!


For now my Amiga 500 is where I want it to be upgrade-wise. I could install the Vampire 500 V2 into it, but as regular readers know, that is how I ended up with a non-functional Amiga 500 in the first place. I am happy with it at this point. I will leave well enough alone this time!

I am giving thought to putting the Vampire 500V2 back into the A2000HD with a CPU slot adapter to solve the previous problem of it being unreliable on the A2000 68000 slot (popping off on cool down needing the case and internal floppy drive frame assembly to be removed every time I powered on). I have recently picked up a CPU slot adapter for this purpose. A likely future project when I have free time for it.


Saturday 18 August 2018

Vampire 600 V2 Accelerator on Amiga 600

I finally took delivery of my new Vampire 600 68080 accelerator, which I couldn't wait to get up and running on my Amiga 600!


For those who follow my blog regularly, you will know that my Amiga 600 was featured in a "from scratch" build series of blog posts, covering all the various upgrades and OS build on it. You can do some catch up reading on the articles below if you want to know more about the hardware in this Amiga!


This machine has had a lot done to it since I got it in 2014!

With that, I fished out my Amiga 600 from storage (I don't have enough room to have all systems set up unfortunately), and hooked it up to make sure it still works. I am pleased to see all is well!


I also connected up 3 "new" external floppy drives I bought recently from Ebay as I only had one Amiga 1000 era 1010 external floppy drive left that worked! I am pleased to say the "new" drives all work perfectly so now I have 4 working external floppy drives. :-)


Next I pulled the Amiga 600 apart in preparation for the Vampire 600 accelerator installation. As you can the Amiga 600 is already heavily upgraded internally. Please check my earlier blog post linked at the top of this post for all the details on these upgrades.


Unfortunately as nice and neat as this is, I have to rip everything out, even the motherboard....

So now I turn my attention to the Amiga 600 ultimate upgrade - the Vampire 600!


You can read a lot more about the specs of the Vampire 600 V2 here on the official site:

http://www.apollo-accelerators.com/files/Apollo_datasheet.pdf

Here is some close up shots of the Vampire 600 V2, Revision 2.1:


Above, you can see the power and activity leds, fpga, hdmi port, micro-sd card slot, and expansion port.

In the shot below you can see the connector that sits over the top of the 68000 CPU that is surface mounted on the Amiga 600 motherboard. This board was made in 2018 so pretty new :-)


Some more closer views from different angles for those who want more detailed look. You can click on the images to supersize them to the original size.


As a comparison, you can see the size difference between the Vampire 600 II and the Vampire 500 V2 boards below:


You can read my Vampire V500 blog entries here:

https://amigax1000.blogspot.com/2016/12/vampire-500-v2-part-1.html
https://amigax1000.blogspot.com/2016/12/vampire-500-v2-part-2.html


For the Vampire 600 build on my Amiga 600, I also bought some IDE to SD card converters from Ebay to allow me to use much more common SD cards on my Amiga 600, rather than the more expensive CF cards.


Next I have my new 32GB SanDisk card to use in the adapter, which I will connect to the Amiga 600 IDE connector. Here is the final setup:


I used my Windows 10 PC to download CoffinOS R51 (google for the link) which is designed to fit on a 32GB SD/CF card. I used Win32DiskImager to write the image to the MicroSD Card. It is Vampire ready setup of AmigaOS, with everything needed already installed and setup ready to use!


As mentioned earlier, it is necessary to completely disassemble the Amiga 600, including removing the bottom protective tray. This takes a while to do, and is quickly fiddly:


Removing these screws from the ports on the back of the Amiga 600 is a real pain...but I got there.


With that done, you can now see the naked Amiga 600 board, top and underside views:


The reason we have to remove the board from the Amiga 600 is because the Vampire 600 is fitted over the 68000 surface mounted CPU, which is not a very snug connection, and can easily fall off with the A600 being moved around, etc. To eliminate this issue, the Vampire 600 includes two screws that need to be install into two holes in the board that line up with two holes in the Vampire 600 board:


Here is a view of the two holes in the board, centre left and right:


The nuts on the screws are really tiny and fiddly to get off/on:


Here is the first screw installed from the bottom with the head on the bottom of the boards, with main shaft of the screw peeking through the board as below:


I then installed the second screw in the second hole...


With that done, you can now see the two screw poking up on the top of the board:


We then attached the long spacer on the screws, which is what the Vampire 600 board rests on.


I then push the Vampire 600 board onto the 68000 CPU, and make sure the screws poke through the holes on the Vampire 600 board:


With that done, I have to put the tiny nuts on the ends of the two screws to secure the Vampire 600 to it's final position.


And here it is, fully installed:


I next have to put the whole Amiga 600 back together....


Almost there, you can see the new IDE to SD card converter board is installed now too.


Ok, finally done.


I put the case back on and connected the HDMI port with a HDMI cable to connect the Vampire's Picasso96 RTG board (SAGA driver) to my screen and connect the Indivision ECS VGA output to the same display (I have both VGA and HDMI inputs.


The HDMI cable fit is REALLY tight with the subway USB board installed:


I need a HDMI cable with a much smaller connector I think - I can see this would potentially lift the Vampire board from the socket if the cable is moved around too much:


When I power on, the CoffinOS R51 boots up from the SD card and prompts me to immediately update the firmware on the Vampire to the latest version.


I proceed with the V600 upgrade to the Gold release v2.9, the minimum needed for this build of CoffinOS. I was surprised the board didn't come with the latest release, but not a problem.


All done!


Next I rebooted the Amiga 600 and greeted with a black and white boot screen. This is a good sign since it means the Vampire RTG is working and booting up, but unfortunately means that my specific Vampire 600 board needs a newer version of the firmware which has my registered Vampire serial number included in it.


The CoffinOS desktop soon appears, and all appears good:


I soon had music playing on the system:


With AmigaAMP and Eagleplayer music players on the CoffinOS base build, there is plenty of options for audio enjoyment out of the box!


The default resolution is 800x600x16bit, but you can of course bump that up to 720p if you desire.


I note that the Trident (Poseidon USB) setup under CoffinOS does not have the required driver for my Subway USB card connected with the A604n expansion board. I will need to load the correct driver from icomp.de support site.


The Vampire 600 has 128MB onboard memory, and combined with the A604N memory means I have 2MB Chip memory, and 128MB fast, which is great.

I tested some RTG demos like Swansong which was included on the CoffinOS 32GB image, which previously I could only run on my Amiga 4000D/T with AGA chipset and 060 board. Runs very well indeed on the Amiga 600 now!


As mentioned, I need to upgrade the firmware on the Vampire to a newer version - Vampire purposely reduces the display output to black and white for unregistered boards to fight counterfeit boards and people running unsupported/beta versions of the Vampire firmware.


As you probably are aware, getting the updated firmware onto the Amiga 600 turned out to be trickier than I initially expected, since I couldn't use the USB driver, even with the correct drivers installed from floppy disk...

So I had to come up with another solution. I turned to my AmigaOne X1000, with it's catweasel X1000 hardware installed, which allows me to read/write native Amiga floppy disks under AmigaOS 4.1 Final Edition.

However the firmware archive for the Vampire is much bigger than a standard 880k Amiga floppy disk.

So, I downloaded fsplit from AmiNet, which is an OS3.x tool that runs perfectly fine natively on AmigaOS 4.1.


I then downloaded the latest Gold V2.10 firmware from the official Apollo Accelerator support page using my AmigaOne X1000, and used fsplit as below on the archive, which by default splits the file in two. The resulting two files can each fit on a single floppy disk, so I copied each file to a floppy disk, and then copied them onto the Amiga 600 hard disk!


I then use the standard join command on the Amiga 600 to join together the two split files into one archive file. Here are the commands I ran and the files on the Amiga 600 after this is done:


I then extracted the lha archive as below:


I read the instructions on how to flash the Vampire from the Amiga Shell, which is quite easy, just run the flashromkickV3_c_5633_11x_c7g command:


I ran the required command to flash the firmware, and it finished quickly and succesfully:


After another reboot, I now have an updated Gold V2.10 and more importantly, colour!


After seeing everything in black and white for a few hours, it is great to use in colour finally!


I change the backdrop quickly, as I don't like it to be honest. I also changed the theme to use a more traditional AmigaOS window frame set:


I could then enjoy more RTG demos that normally need an 060 AGA Amiga on my little Amiga 600, all thanks to the Vampire 600 accelerator!


I also updated the SAGA RTG drivers to the latest version, again using the fsplit method on my AmigaOne X1000 to get the files across using floppy disks. I really need USB and network support soon...


That concludes my build for now. Clearly there is a lot more to do, but it is exciting to finally have a Vampirized Amiga 600 here!