Today I decided to install my AmigaOS 4.1 Final Edition Classic onto FS-UAE running on my MacOS X Yosemite (10.10) Macbook Pro.

Last year I setup AmigaOS4.1.6 Classic on FS-UAE on MacOS X Yosemite for AmiWest 2014.
With the release of the new Final Edition Classic version and the considerable updates to FS-UAE since then I thought it was a good time to get AmigaOS4.1 Final Edition Classic installed and running under emulation on my MacBook Pro. (which for reference is a Core i7 2.6 Ghz Late 2013 model with 16GB memory, Nvidia Geforce GT750M 2GB, and 1TB SSD)
I followed the procedures outlined on EAB's FS-UAE support forum thread here on how to install AmigaOS4.1 on FS-UAE. This is a very good guide indeed!
Some changes since I installed AmigaOS4.1 Classic on FS-UAE last year include several major upgrades to the WinUAE base build used for FS-UAE, the support of VHD (resizable) virtual hard disks, SFS0 hard disk partition support (enabling SFS0 hard disk installs to larger HD sizes), Tocatta Sound card support and more too!
Another change is the update of the QEMU PPC plugin to the latest 3.6 version here (at the time of writing) to use the latest development build of FS-UAE 2.5.29dev, available from here for Mac OS X.
Another new tool in Mac OS X is the VHD Creator tool that can be used to create hard disks that grow as data is put into them, rather than consuming all the space allocated straight away. You can download this VHD Creator tool from here. Once downloaded you get this program to create the VHD virtual hard disks needed for the AmigaOS 4.1 Final Edition Classic installation.

So let's get started with creating an AmigaOS 4.1 Final Edition Classic setup using FS-UAE on Mac OS X Yosemite!
I will assume you have downloaded and run FS-UAE Launcher for MacOS X (you need to run it once to create the FS-UAE folder structure under Documents).
I also assume you have the QEmu 3.6 plugin and have put the legal Amiga Forever CD kickstart ROMS, Picasso IV ROM and Cyberstorm PPC ROM file into the correct places in the Documents/FS-UAE/Kickstarts folder.
As a reference my Documents/FS-UAE folder structure looks like this (before I put the latest QEmu 3.6 into the Plugins folder):

I then copy the latest QEmu PPC 3.6 plugin to the FS-UAE/Plugins folder, and archiving the old versions under a new sub-folder I called Older Version:


I used VHD Creator to create the virtual hard disk. when I run VHD Creator it prompts to specify whether you want a fixed size or dynamic:
I also assume you have the QEmu 3.6 plugin and have put the legal Amiga Forever CD kickstart ROMS, Picasso IV ROM and Cyberstorm PPC ROM file into the correct places in the Documents/FS-UAE/Kickstarts folder.
As a reference my Documents/FS-UAE folder structure looks like this (before I put the latest QEmu 3.6 into the Plugins folder):
I then copy the latest QEmu PPC 3.6 plugin to the FS-UAE/Plugins folder, and archiving the old versions under a new sub-folder I called Older Version:
I used VHD Creator to create the virtual hard disk. when I run VHD Creator it prompts to specify whether you want a fixed size or dynamic:


Next we need to create an image (iso) of our AmigaOS4.1 Final Edition Classic CD, to be able to mount it in FS-UAE. I used Toast 11 for this, but you can use whatever your favourite image creation program is on Mac OS X. Select the Disc Copy function.


Once created it will prompt to save the .toast image file somewhere - be sure to save it to Documents/FS-UAE/CD-ROMS - I called the file AmigaOS 4.1 Final Edition.toast:


That done, now run FS-UAE 2.5.29 Launcher and we can start to configure.
In my case I have some configurations from previous setups - click on the New configuration icon (shown below next to where it says AmigaOS 4.1 Final Edition) to create a new configuration, and title it AmigaOS 4.1 Final Edition (or whatever you want to call it) - select Amiga 4000 (PPC/OS4) as the Amiga Model:


Then add in some lines to set the type of the hard disk to rdb, and optionally you can specify the location of the cdrom and hard disk here too (click to expand any of the pictures):

I went into the CD icon tab and added some additional iso's I created from the previous AmigaOS4.1 classic install from last year that contain some utilities and programs I want to install once the installation of AmigaOS4.1 Final Edition is done. You need to add these iso files to the CD-ROMS folder in FS-UAE to have them visible immediately when adding them in here:


It will then appear as selectable on the left hand pane:

Now we are ready to launch the emulation - Click on Start to get underway - you can use the window/full screen button next to it to change if it runs in full screen or window mode:


Use Function + F12 (if using a mac keyboard) to bring up the Emulator control menu as above, and select Reset Amiga > Soft Reset. Immediately press the ESC key to get the Cyberstorm PPC menu as below:


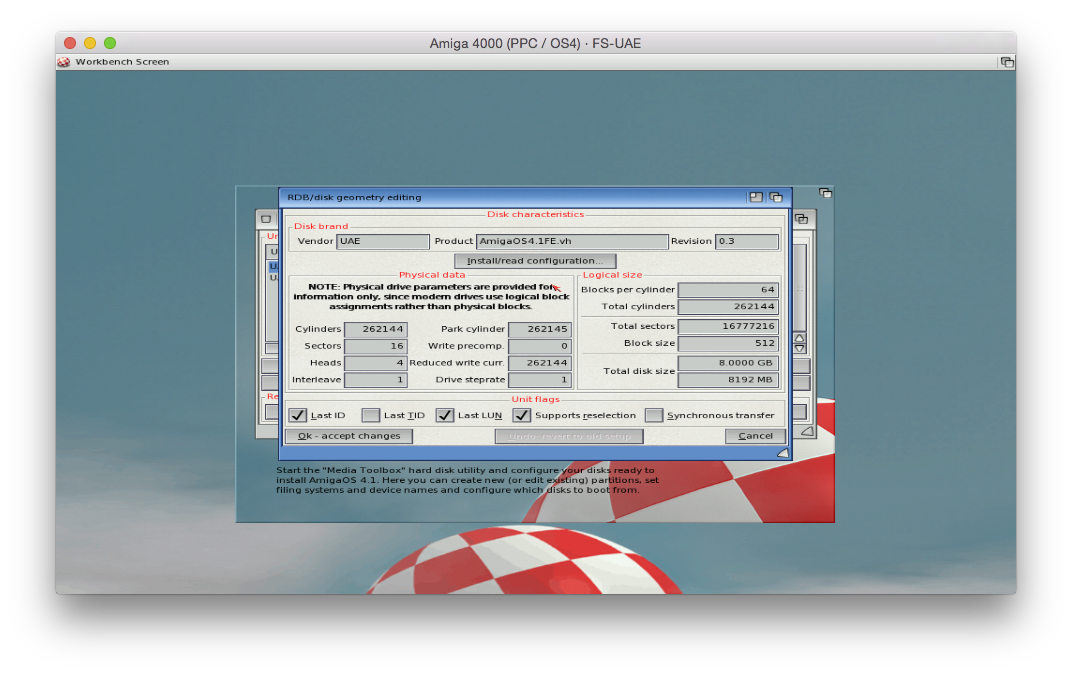
It should prompt to initialise the hard disk and give you a screen similar to below - make sure the Total Disk Size field matches what you specified in VHD Creator tool and then click on OK - accept changes:
The AmigaOS4.1FE.vhd hard disk appears in the list along with the CD:


To do this, click on Add, remove or edit filesystem option - you will then get the screen below:


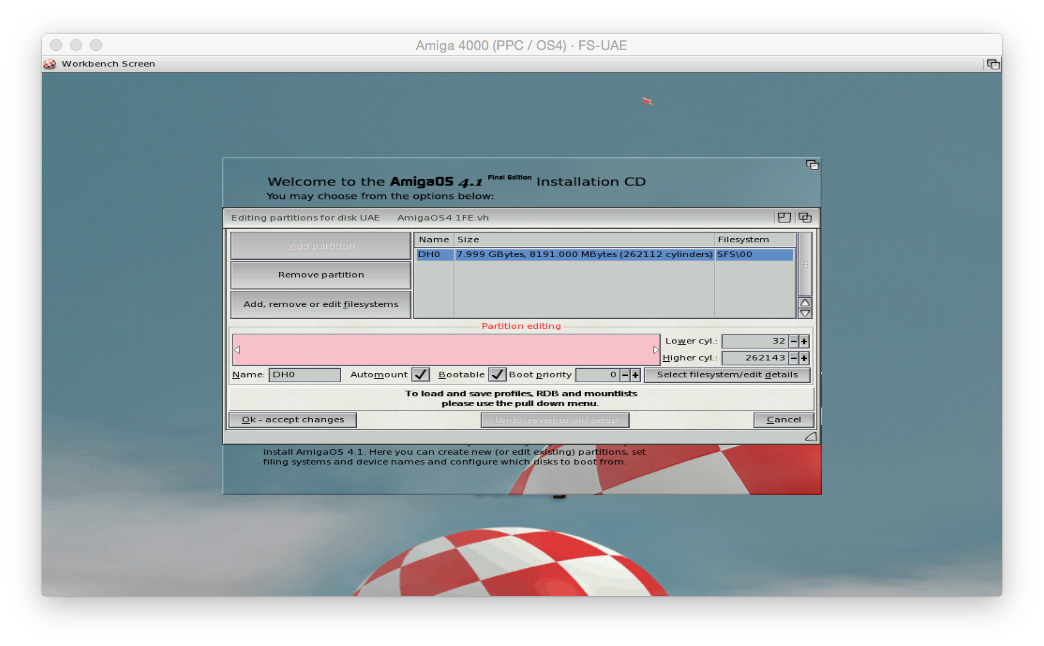
We need to create a partition, so click on Add partition - It will create DH0 using the full partition space:

Click on Select filesystem/edit details button - you will then see the following screen:

We need to modify the filesystem Type field from Standard filesystem (FFS) to SmartFilesystem (SFS\00):


Now click on Save to disk:


You now have the option to Eject - press Enter on it to do so. Then you can click Finish on the last screen to reboot the Amiga. (If you don't do this then the live cd will boot instead of the hard disk)

The first time I did this I forgot to set the Bootable flag (!), so I just got the Insert disk screen and a non-bootable hard disk as shown below in the Early Boot Menu (press both mouse buttons when booting):
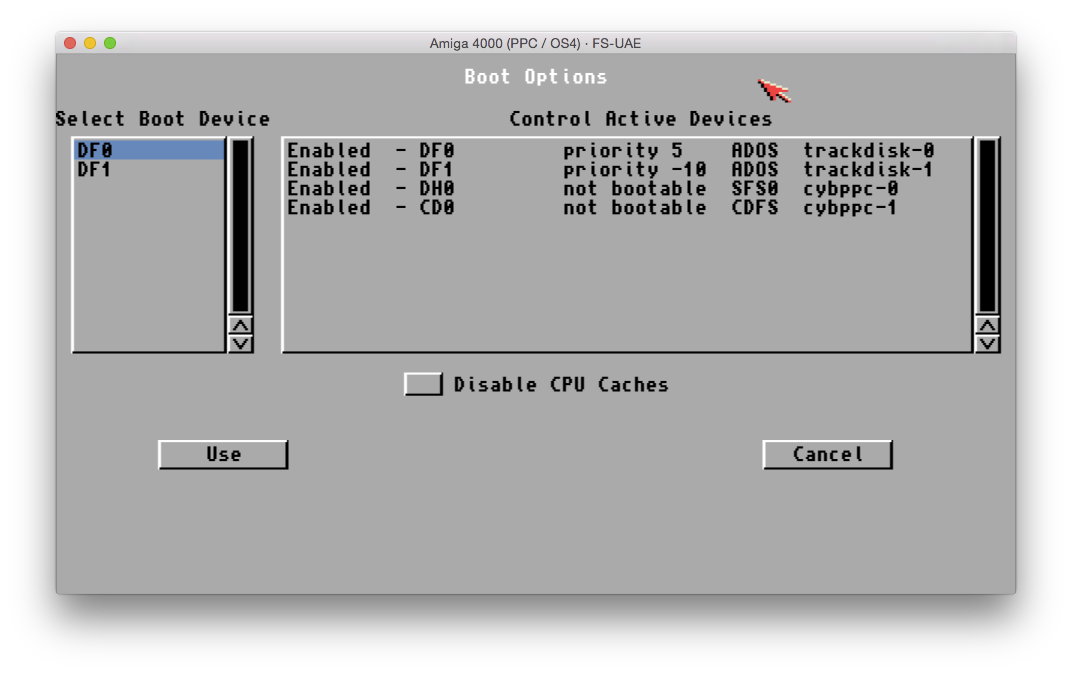
I then mounted and booted the AmigaOS 4.1 final Edition Classic iso again (via Function + F12), ran the hard disk partition tool option and quickly fixed DH0 to be bootable and all good:
Success - it now boots AmigaOS 4.1 Final Edition from the virtual hard file and presents me with the standard post-installation options screen!


I now have a working AmigaOS 4.1 Final Edition Classic setup on FS-UAE on my Macbook Pro
Next step will be getting the network card working on emulated system...which requires the ethernet.device driver from Aminet. Then Amistore, toccata support and more! But that is enough work for one day - I'll cover these in a future blog entry!
Followed the entire path, but still unable to boot, it says
ReplyDelete"Kit direct is not compatible with emulated Blizzard accelerator boards
Error loading Qemu-UAE plugin
PPC: Error loading Qemu-UAE plugin"
And then, only a green screen... any hint, please? :(
Hi there, my name is Rico and i like to know if an ethernet connection is already working on FS-UAE AmigaOS 4.1 FE ??
ReplyDeleteThank you! Worth noting, that you should not add any Folder HDDs, because it won’t work and the installer will stuck on the purple screen.
ReplyDeleteDid you make the network card work??? Can you share the details?
ReplyDelete