
By default in AmigaOS4.1 Final Edition, when you run the Shell you will get the standard Shell interface carried over from AmigaOS4.1.6, but now with tabs visible at the top of the Shell:


If I select Project > New Shell from the right click menu, I now get a new tab within the current Shell window with another shell running:

You can click on the tabs to switch between the running Shells. In addition you can also right click in the Shell Window and select View > Prev Shell or View > Next Shell to switch tabs (keyboard shortcut Amiga + < and Amiga + > also work to switch to the next or previous tab):

In the right click menu under View you can also select Select.., which pops up a window of currently open Shell tabs to select from - once selected it will switch to that tab:

Under Right click menu in the Extras option, there is a Help option. When selected, you get a helpful Amigaguide document that explains the new features and how to use the Shell (Console):

Controls and Keyboard shortcuts are also covered well in this help documentation:


Ok, so lets now take a look at more of the customisations we can do in the new Shell. Right click on the Shell window and select Settings > Edit..

The Shell (Console) Preferences window then appears as below:

Time to play! First of all I will change the Text Font from the default to aix/15 by select the Ff button under Text Font to select it from the list of fonts available on the system. I also select the ClickTab Labels section and put in Epsilon - this will then label the tab as Epsilon:

Here is the resultant Shell after I click Save:

Opening a new shell - Right click Project > New Shell, then replicates the same settings as the previous Shell window had:

Ok, so let's go back to the Console Preferences window again (Right click, Settings > Edit..). I will change the Cursor Style section next, changing the Cursor Type to Vertical Bar:

This gives the Shell a cleaner look in my opinion:


By default it uses System Pens as the default Palette - but there are other options - Full ANSI Colours, Faint ANSI Colours, and User colours are now available in the drop down selector:

So I select Full ANSI colours to start with, which alters the foreground and background colours available to select from:

A preview of the resultant Shell appearance is at the bottom of the tab, which is very helpful. When you select Save, the resultant Shell is now quite different:

Personally though, I don't like these colours. So back to the Console Preferences > Text Colours tab, I change the Background Colour to Blue and Foreground colour to White, as shown below:

Here is the resulting Shell:

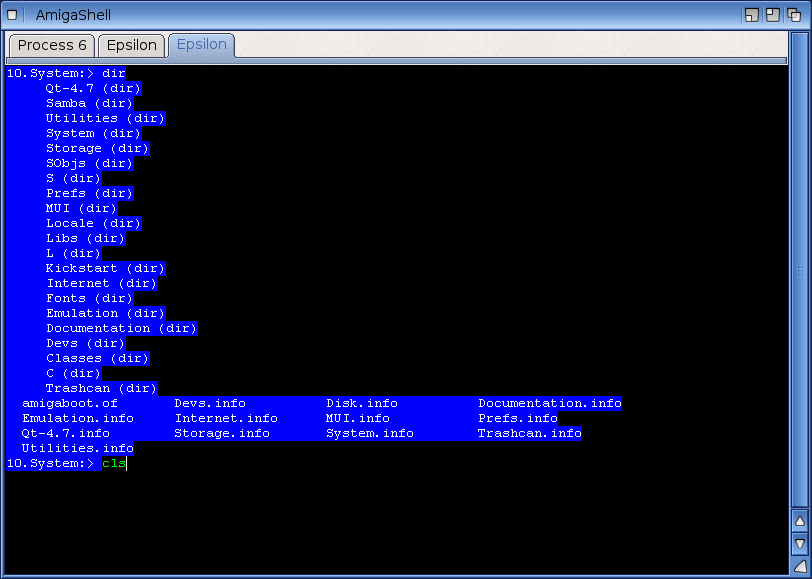
I like this look, but decided to take a look at the IBM terminal green on black look for a retro feeling:

BTW when I click Save each time, I then type in cls to reset the Shell window - it doesn't show the changed colours in full until you do so:

Any new Shell window I open now inherits these settings:

But I decided to restore it back to the white on blue that I liked earlier:

Ok, so now let's take a look at the Completion tab on the Console Preferences window:

One of the features of the new Shell is TAB completion, which means that the Shell will autocomplete filenames and directory names as you type them in by pressing TAB. Where more than one entry has the same matching characters as those you have typed, press TAB again and again will cycle through the options.
It is very nice, and glad to finally have it in AmigaOS4.1 as a default Shell function.
In the Completion tab you can modify the behaviour of the TAB completion functionality so it allows you to tab through .info files, assigns (eg. S:), the sort order of tab completion (by default files first is the most common) and more - I added Show Assigns:

Example of tab completion is shown in the Shell sequence below - I start in the Shell by writing s: to cd to the s directory, and then type and a space:

When I press tab at this point, it allows me to tab through all files and folders in this location by continuing to press Tab until I get the one I want:


If I don't want tab anymore - I can backspace to remove the last result and do it again. In this case I wanted Shell-startup:

While I am talking about S:Shell-startup, I also can modify the appearance of the default prompt and add aliases for shell commands in this file. This is global and affects any Shell window you open. If you open it in Notepad you get the file as follows:

In this case I want to modify the Prompt in the shell so the current directory listed in the prompt is a little more clear - I insert [] -> into it as follows:

So once saved, I launch the Shell again, and the new prompt appears:


I like it, but of course you can customise however you prefer to have it!
If I go back to the Console Preferences window again, I want to change the behaviour of the TAB completion in the Completion tab. I change the Multiple Choices appear option to In a list. as below:

Now when I do TAB completion in the Shell, a small window pops up with all the choices to select. This is very nice as it saves tabbing multiple times to get the one you want:

Last, but not least is the Options Tab in the Console Preferences:

In here I can change the settings that keep a history of the shell commands I have typed (available by continuing to press up arrow on the keyboard in the Shell). You can choose to permanently save this history (which is normally lost when the Shell is closed) so the historical commands you types are always available to you. You change the Save history on exit option to do this - restarting the Shell is needed for this change to take efffect:

In the same tab you can also modify the Save Settings Options to save these settings for this Shell window, or for all future Shell windows, or this window and all future ones.

Going back to the Shell window, you can also close the current Shell tab from the Right Click > Project > Close Shell option as below - you can also select Close All to close all tabs:

Also in the same right click > Project menu is the option to iconify the Shell to an icon on the Workbench - useful to get it out of the way and double click on it again to restore the window when needed (you can also click on the iconify button on the top right of the Shell window):

The Console Preferences is also available in the Prefs window - you don't have to have the Shell open to access it:

The final bit I will look at in regards to the Shell is changing it's launch window size and title.
The Shell program itself is located in the System:System folder. Right click on the Shell icon and select Information as below:

In the Information window for the Shell, select the Icon tab:

In the tool types section we can change the size of the default Shell window and the title of the Shell window, amongst other things:

Update 25/1/2015: Lyle Haze pointed out to me that there are a lot of other options you can put into the tool type WINDOW= definition. This included in his additional information below - thanks Lyle. I hope this extra information is useful to you all too:
WINDOW=CON:875/200/700/400/Epsilon's Shell %N %D %T Elapsed:%E Return:%R %W Current Directory %S/TABBED/CLOSE FROM=s:shell-startup
Structure of the options from left to right above is: leftedge, topedge, width and height, and your choice of shell-startup files at the end. (you can have multiple Shell-startup files)
The Shell title in the middle of the sample above has lots of added options possible beyond just the Shell Name itself. In the example above:
%N is the process number.
%D is the date.
%T is the time.
%E is _exactly_ how long it took to complete the last command.
%R is the return code (result) of the last command.
%W is the error code for the last operation
%S is the current directory.


I hope this look at the new upgraded Shell in AmigaOS4.1 Final Edition is useful! There is certainly many new features.
Thanks for the detailed write-up. It is quite clear a *lot* of work went into this new shell.
ReplyDeleteThis is truly impressive! I need to try to do the same for my setup as well.
ReplyDelete