
Previously I installed AmiKit Real 8 on my Amiga 1200, but I need the latest AmiKit Real 9 for my Amiga 4000T as it's hard disk failed earlier this year after 16 years of service. I decided to install AmiKit Real 9 on both systems as new builds, one as RTG (A4000T) and one as AGA (A1200).
The build work took place over the past week and a half or so, after work and the weekends!
I decided to replace the hard disk in the Amiga 4000T with a new 64GB SD Card, used in conjunction with a SD to IDE converter I purchased off Ebay for this purpose.
For the Amiga 1200, I purchased a new 32GB CF card as I have a IDE to CF converter already installed in the A1200.
The Amiga 1200 also has a Indivision AGA MK2 for DVI output and an Individual Computers 54Mhz 68030 accelerator with 128MB memory.
I decided to tackle the Amiga 1200 build first, because I can then use it as the base build for the more difficult Amiga 4000T build. The A4000T build will be a customisation of that base build to support Mediator, Picasso96 RTG, audio, Deneb USB, CD and other goodies too.
Enough chat, let's get into the build itself. I pulled apart the Amiga 1200 to remove the old CF Card and install the new one, which is a completely blank FAT32 formatted for PC stock CF Card.

Anyway, for now I will rely on my Amiga 4000D system with it's working Rapid Road USB support for data transfers, etc as we move forward with this installation.
Because I am using Workbench 3.1, I am limited to configuring the CF card in HDToolbox to 4GB with 2x2GB partitions, one labelled AmiKit and one labelled Backup.
I cheated a little by using my Amiga 4000D with USB with AmigaOS 3.9 Boing Bag 2 to partition the drives on the CF card using a USB to CF converter. This meant I could create the other partitions for music, demos, games and photos beyond the 4GB barrier in preparation for later when AmigaOS 3.9 is installed and can "see them".

For safety though I kept all the extra partitions I created just under 4GB (3.9GB actually) until the CF card was filled up. I didn't format any of the extra partitions at this stage as there is no point.
As a safety measure I always setup the initial two CF hard disk partitions as 1.9GB in HDToolbox to make sure they are definitely under 2GB. I then formatted the partitions as AmiKit and Backup and copied the AmigaOS 3.9 source files and Boing Bags 1 and 2 to the Backup partition.
These files will be needed on the CF card to install AmigaOS 3.9 over Workbench 3.1 as there is no CD drive on my Amiga 1200 to do this.
I then downloaded the AmiKit Real 9 files from their website and extracted the zip to a USB stick on my Mac. I then put the USB stick in my Amiga 4000D to copy the files to the A4000D hard disk, and then copy to the Backup partition on the CF Card.
Whew!
With that all done I could then put the CF Card in the Amiga 1200.

I plan to do a separate new build blog post for AmigaOS 3.1.4.1 on my Amiga 600, following on from my previous quick look at AmigaOS 3.1.4 on my Amiga 500 back in December. I am working on the A600 build at the same time as this build actually, while waiting for steps to complete! Three Amiga builds at the same time - definitely multitasking :-)
Here is the initial booted Amiga 1200 from the Workbench 3.1 Install floppy disk.

I ran through the installation of Workbench 3.1, inserting each of the disks when prompted. With the install completed successfully, I removed the floppy disk and booted off the CF hard disk into Workbench 3.1! I made a drawer called OS31 on the Backup partition to copy the completed installation to. That way I can copy it to my A4000D via USB later to use on other CF/SD cards for Amiga to avoid this step in the future!
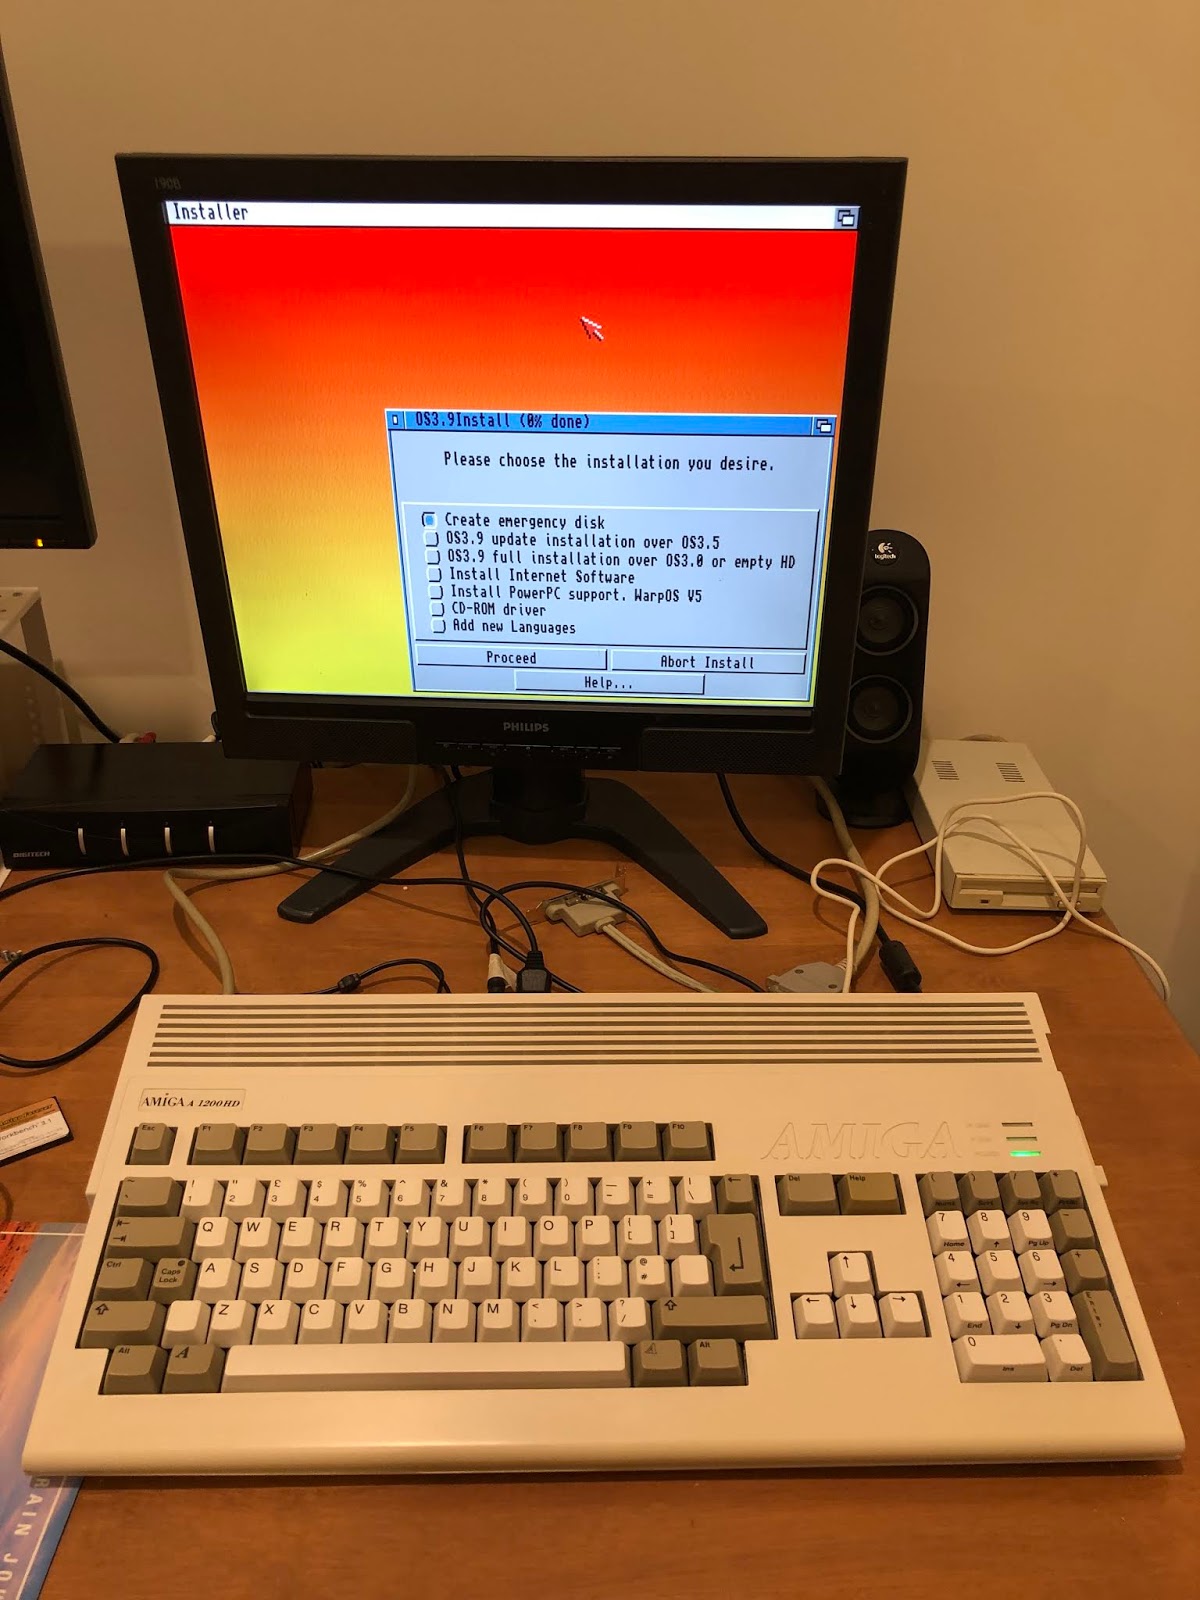
Next I ran the shell and ran an assign for AmigaOS3.9 to point to the drawer where I copied the AmigaOS 3.9 source files. This needs to be done for the AmigaOS 3.9 installation to work from hard disk as the source. I then stepped through the AmigaOS 3.9 installation on the Amiga 1200, upgrading the Workbench 3.1 installed on the CF card:

I selected to do full installation over OS3.0 or empty HD.
Install is completed!

After the install is done, note that you need to re-run the AmigaOS3.9 CD assign and installation again to install the Internet software option and CDROM driver option, as they are not installed with the main AmigaOS 3.9 installation.
Now I am booted into AmigaOS 3.9 using the new Cf card on the Amiga 1200, I can now see the other partitions I created earlier.
I elected not to copy any of my music, demos, games, etc to the new partitions until I was sure the installation of AmigaOS 3.9 and AmiKit Real works. Otherwise it might all be a waste of time!

I formatted the extra partitions as International FastFileSystem at this point, but left them empty for now.

I then ran the CD assign in Shell again for AmigaOS3.9 to the drawer containing the OS3.9 files so I can install the Boing Bag 1 and 2 files, which require the CD to be present to install.

Boing Bag 1 patches installed:

Boing Bag 2 done too - note that you need to ensure the ROM update with Update 2 is not installed as part of the update, as the system will not boot afterwards if you do!

With the Amiga 1200 now setup with AmigaOS 3.9 Boing Bag 2, I backed up the whole lot to a OS39BB2 drawer on the Backup partition.
This will provide a backup in case the AmiKit Real install goes wrong - I don't want to do all these steps again. Also, I will copy the drawer to my Amiga 4000D to make the installation of AmigaOS 3.9 BB2 onto any future SD/CF card easy as I can just copy it across rather than having to sit through the installation as I did here.
I am trying to make my life easier for rebuilds in future!
Next I read the instructions for AmiKit Real 9, which is included in the archive I extracted to the CF Backup partition back on the Amiga 4000D earlier.

As it says, you must have an AGA Amiga with 16MB memory, and 030 accelerator and a clean installation of AmigaOS 3.9 (which requires Workbench 3.1 installed first). These requisite steps were already completed as covered earlier in this blog entry.
The destination bootable drive needs to be called AmiKit, which I did when I originally formatted it.
With that done, and a backup of our AmigaOS3.9 install done in case it all goes belly-up, we are good to go with the AmiKit Real 9 installation.

I double click on the Install icon in the AmiKit Real 9 drawer to get things underway. It warns you need to have a backup (which we have done) before we start as there is no way to stop it once it gets underway.

I click Continue and a very large number of file are then copied to the Amikit partition - definitely time for a coffee and dinner - it takes a while:

Eventually the installation completed and we are ready for the final reboot:

The first boot of the Amiga 1200 with AmiKit Real 9 installed:

Success! It boots into AmiKit Real 9!

I hit a bit of a snag though in that the interlace modes don't display well at all on the Philips TFT screen I am using on the Amiga 1200. Even with the flicker fixer in the Indivision AGA it has a horrible artifacting flickering on the screen that is impossible to use it with.
Non interlace stuff like PAL screens works fine though, like running the PhaseOne demo included in AmiKit Real 9. I quickly ran it to make sure the mode worked ok, and yes, because I like Amiga demos :-)


You see, a second hand shop called Cash converters has a pile of these "old" 4:3 TFT screens selling for $5-$15!!!
Indeed the Philips TFT cost $5 and I got it a few weeks ago for the A1200! I picked up a few more from a local Cash Converters while waiting for OS3.9 to install, and this LG 19" TFT I bought for $15 works great with the interlace modes needed by AmiKit Real 9 for the Workbench:

One mans rubbish is indeed another mans treasure. :-)

The AmiKit Real 9 titlebar (which is running DOpus 5.82 in workbench replacement mode) has too much text to fit the low resolution on the Amiga 1200, so I edited the environment titlebar settings to fix it so it fits better, and changed the backdrop to one of the many others included in the AmiKit Real distribution - much better:

Currently this is using 16 colours, so it can of course look a lot nicer with 256 colours. However it would also be a lot slower. For now I'll leave it at 16 colours.
With this base installation working, I remove the no longer needed OS3.9 and Amikit Real 9 source files on the Backup partition, and copy the full working installation files of Amikit Real 9 from the AmiKit partition to the Backup partition.
Given this takes a while I get to enjoy the Matrix screensaver included with AmiKit Real 9 which activated automatically after a few minutes while I was waiting..

This completes the AmiKit Real 9 build for the Amiga 1200. There is more to add - the demos, games and music for a start. I did this copy to the CF card on the Amiga 4000D later on.
I have no intention of doing those steps all again for the Amiga 4000T SD Card!
Speaking of which, I attached my 64GB SD Card (actually a MicroSD card in a SD Adapter) to my SD-USB converter on the Amiga 4000D so I can prep the card in HDToolbox.

My Amiga 4000D is getting a serious workout!
I then copy the AmiKit Real 9 backup from the A1200 CF card (now on my Amiga 4000D hard disk) onto the SD Card Amikit partition - I also copied the Phase 5 68040 and 68060 libraries and the A4000T workbench.library into the LIBS drawer on the SD Card, that is needed uniquely for that machine to boot:

This took a long time.
Even longer since I also set up the other partitions beyond the 4GB barrier to copy many gigabytes of music (mainly MODS), AGA/ECS demos and AGA/ECS games from my Amiga 4000D to the SD card.
I also did the same copy on the A1200 CF card extra partitions afterwards so the same content is now on all three Amigas - plenty of backups now!
The total time to copy all the files covered several days with work in between...
With that finally done, I then opened up the A4000T to install the SD Card:

With the card installed in the IDE to SD card converter, I switched on and happily the system booted up first time into AmiKit Real 9 - success, but a lot more work to do to get the RTG and other addon's working:
I have two TFT screens on the Amiga 4000T, one connected to the Indivision AGA Mk2 output for the native Amiga output (the right side screen), and one connected to the 3dfx Voodoo3 PCI card RTG output (left screen). At the moment the output is via the native output:

First up I need to install the Mediator PCI drivers so I can use the SoundBlaster128 PCI sound card, Voodoo3 PCI graphics card and the PCI network card on my Amiga 4000T - I used the Mediator CD to install that, as I copied the CD0 definition file from my A4000T backup on the A4000D to mount the A4000T's CDROM drive:

With the drivers installed and a reboot later, I then wanted to use the RTG screen mode - I copied the Voodoo driver and Picasso96 setting file from my A4000t backup on the A4000D, but I still couldn't see the Voodoo modes on the Screenmode prefs
I worked out to fix this I needed to disable the Cybergraphics drivers that are included with AmiKit Real 9, as they don't work at the same time as the Picasso96 RTG driver support.
There is a line in the startup-sequence that runs the cybergraphics driver - I disabled it and after a reboot I could now see the Voodoo screen modes in the Screenmode prefs:

Closer look at the screen mode prefs below - I should mention that when you disable the cybergraphics support and don't have the voodoo screen mode selected yet, it defaults to PAL and uses all the chip memory booting up! I couldn't even open a window or menu to run screen mode prefs!
I worked around this by closing non-essential stuff from the wbstartup drawer temporarily, and then using the shell to run screen mode, which worked!

I could then set the Voodoo3 screen mode at 1280x1024 in 24bit colour and after a reboot I got all my chip memory back and a beautiful RTG display:

It just looks amazing!

RTG is the best way to experience AmiKit Real 9 - it looks gorgeous:

I could use the screen grabber software to grab some screenshots from the OS itself. The Amikit Real 9 transformation of AmigaOS 3.9 is stunning, really:

You can turn on the RTG icons and RTG theme support options in the included Morpheuz software, which lifts everything up to another level - I also edited the Visual themes via Morpheuz to use the AmigaOS4 style theme, which uses the AmigaOS 4 lookalike windows and titlebar:

AmiKit Real 9 includes a number of games and demos with it, and a lot of useful utilities and programs - all set up and ready for immediate use:

Plenty of included Utilities:

Riva player for playing back movies, with the Amiga 1000 launch advertisement movie included...it does work but the SGrab software doesn't capture the video itself when screen capturing for some reason!

Plenty of internet programs included too with AmiKit Real 9:


Close up of WB Dock:


I transferred my photos across to the A4000T from the A4000D (as mentioned before), so I can use PicShow to display them. You can display them full screen or zoomed in the Workbench, which looks really cool:

Before I copied the photos to the Amiga systems, I went through the laborious process of converting all of them down to 1024x768 size first. I know the limitations of the processor on the Amiga systems, and the 1024x768 resolution size is realistically the largest it can display in a reasonable time on a 68060 system.
I m already loving AmiKit Real 9 and I have only just started to get familiar with it.
I positioned the SD Card and converter so it is mounted in the front bay of the A4000t in a spare 5 1/4 slot. That way I can still access it when the case is closed to transfer more data to it, or from it.

I got the USB support working by installing Poseidon 4.5 and adding the Deneb USB driver, which means I can now transfer data directly from the A4000T and no longer need to use the A4000D for that purpose.

Included with AmiKit Real 9 is iGame, which allows you to have a launcher for all those WHDLoad games you have scattered all over your hard disk.
Trying to navigate through the drawers to find the game you want to play can be annoying, and that is where iGame comes in. It indexes all the games you have installed to a simple interface to filter/search and launch from. I have not used it before so it is interesting to try it out quickly:

As this is the first time to run it being a new build, I need to specify the game repository paths on my Amiga, where the games are to be found:

I have three 4GB partitions packed to the rafters with ECS, AGA, CDTV and CD32 games all using WHDload, so I add the three partitions into iGame:

I then get iGame to scan the repositories, which takes a little while as I have a lot of games in there! When done, it shows me the list in the main iGame window:

I can filter search or just scroll down to the game I want to play - I can filter by genre, most played, and more criteria:

This also includes WHDLoad demos I have too, so I can launch demos from here as well - neat! You can even add games directly installed without WHDLoad too.

I just double click on the game I want to launch in iGame and it runs the same as if I double clicked on the icon in the drawer, wherever it actually is on my hard disks! Very convenient.

I got a little distracted playing Chuck Rock 2 for a bit after testing this in iGame...

Next up I configured Genesis (Internet connection software for AmigaOS 3.9, installed when I installed AmigaOS3.9 earlier on) to use my PCI network card on the Mediator PCI board expansion on my A4000T:

The connection works successfully first time!

I then fired up AWeb to check Aminet latest uploads:

Given I am now connected to the internet on my A4000T, I took the opportunity to also run the Amikit live update software, which confirms I am running the latest version of AmiKit Real 9, with no updates to install at this time:

If you don't like the WBDock in it's Mac-like form, you can opt for the full Windows style start menu and task bar add-on included with AmiKit Real.
The icon to change it is the last one on the AmiDock on the left hand side. When run, you get this rather cool Start menu:

I can see in the not too distant future that my A4000t will be my main Classic Amiga system again. I still have a bunch of applications to check out on AmiKit Real 9. It is a lot of work to get going, but it is so worth the effort! I love it.
If you haven't tried AmiKit Real 9 on your Classic Amiga yet and it meets the minimum requirements, why not give it a go?
AmiKit Real 9 too slow...
ReplyDelete060, Vampire or UAE. Its same as max bloated OS 3.9, that it is. Yet, offers way more then plain OS 3.5 or OS 3.9, not to mention OS 3.1.4
DeleteI've tried soany times to do this with my 4000T and mediator with no success. I'd love to get it working.
ReplyDeleteFantastic post mate, I'm definitely a fan. :)
ReplyDeleteIt's even to the point that I'm going to find a Mediator for my A4000T to install it too. lol
Question a bit off-topic: did you have to mod your A4000T to install the Indivision ?
On Vamp it needs Vampirizer tool?
ReplyDelete